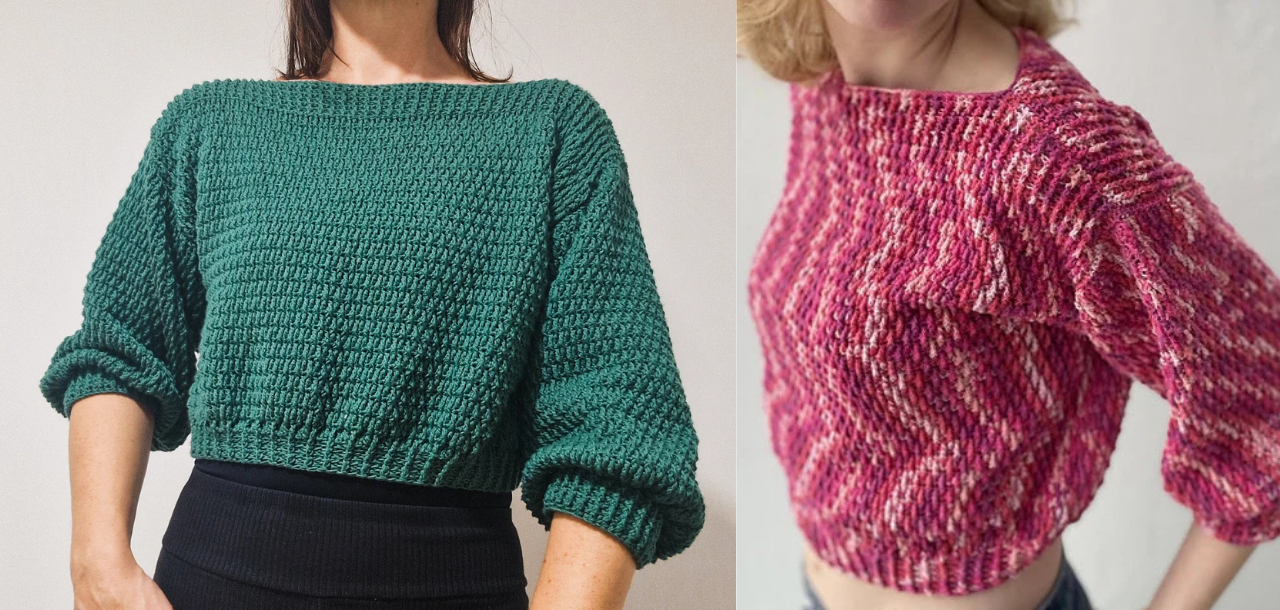
A Fusion of Elegance and Comfort
Hello to all my crochet enthusiasts!
I’m thrilled to unveil my latest design: the Crop Alpine Stitch Crochet Sweater Pattern. This isn’t just any sweater; it’s a blend of classic crochet craftsmanship and contemporary flair. Imagine wrapping yourself in a chic cropped silhouette, accentuated with delicate ribbing that graces the waist, sleeves, shoulders, and neckline. And those puffy sleeves? They’re the cherry on top, adding a dash of sophistication to the entire ensemble.
Now, here’s the exciting part: for those of you eager to recreate this beauty, I’m sharing the free pattern for size XS right here on the blog! Whether you’re looking to make a bold fashion statement or simply want to snuggle up in style, this sweater is your perfect companion.
But wait, there’s more! For all the visual learners out there, I’ve got you covered with a YouTube tutorial where I walk you through creating this sweater in size XS. It’s a step-by-step guide, ensuring you can follow along with ease and confidence.
For those who’ve already fallen in love with this design and are thinking, “But what about other sizes?” – fret not! The pattern is also available for a range of sizes, ensuring everyone can rock this look.
Alpine Stitch: A Crochet Classic with Texture and Depth
The Alpine Stitch is a beloved crochet technique known for its rich texture and intricate design. At first glance, it might seem complex with its alternating rows of single crochet and double crochet, front post treble crochet, but in reality, it’s a harmonious blend of basic stitches that come together to create a stunning visual effect.
What sets the Alpine Stitch apart is its raised diamond pattern, which gives projects a tactile, three-dimensional quality. This stitch is not only visually appealing but also versatile, making it perfect for a variety of projects, from cozy blankets to stylish garments. Its depth and texture provide warmth, making it a favorite for winter accessories and home décor.
Whether you’re a beginner looking to expand your crochet repertoire or an experienced crocheter seeking a stitch with a bit of flair, the Alpine Stitch is a delightful addition to any project.
So, grab your hooks and yarn, and let’s dive into the world of alpine stitches and chic designs.
Happy crocheting!
Materials
YARN: DROPS LOVES YOU 7, color 30, yarn group: A (23 – 26 stitches) / 5 ply / sport
XS: 500 g / 18 oz, 1700 m / 1850 yds
Hook: 4 mm, 5 mm
Yarn Needle, Scissors, Measuring Tape, Stitch Markers
Size
XS
Shoulder Width (in cm): 56
Length (in cm): 41
Stitch Key (US terminology)
ch = chain
st = stitch
sts = stitches
sl st = slip stitch
sl sts = slip stitches
sc = single crochet
dc = double crochet
dc 3 = dc in next 3 stitches
2 dc = two double crochet stitches in one stitch
fpdc = front post double crochet
bpdc = back post double crochet
fptc = front post treble crochet
sk = skip
Specialty Stitch & Technique Key
Alpine stitch
Rows 1-3: Setting up Alpine Stitch
Start alpine stitch with any odd number of stitches.
Row 1: ch 2, double crochet in every stitch, turn.
Row 2: ch 1, single crochet in every stitch, turn.
Row 3: ch 2, *front post treble crochet, double crochet, repeat from * to the last two stitches, double crochet 2, turn.
Row 4: ch 1, single crochet in every stitch, turn.
Row 5: ch 2, *double crochet, front post treble crochet, repeat from * to the last stitch, double crochet, turn.
Row 6: ch 1, single crochet in every stitch, turn.
Repeat rows 3–6 to continue the pattern.
Foundation Double Crochet
STEP 1: Ch 2
STEP 2: Yarn over and insert your hook into the first chain.
STEP 3: Yarn over and draw up a loop.
STEP 4: Yarn over and draw yarn through the first loop on your hook.
STEP 5: Yarn over and pull through two loops on your hook.
STEP 6: Yarn over and pull through the last two loops on your hook.
STEP 7: Yarn over and insert your hook under both loops of the base of the previous stitch (the chain you created in Step 4).
STEP 8: Yarn over and pull up a loop.
STEP 9: Yarn over and pull through 1 (like you did in Step 4), yarn over, and pull through 2 twice (as you did in Steps 5 and 6).
Keep repeating steps 7-9 to grow your foundation double crochet row.
Notes
- Ch 2 doesn’t count as a stitch unless it says otherwise.
- Use a 4 mm hook unless it says otherwise.
- The sweater is made of 2 panels (front and back), and sleeves.
- It’s crocheted from bottom to top.
- First you will make the back and front panel and then the sleeves. You will sew the front panel and the back panel together on shoulders, attach the sleeves, sew the sleeves and body sides together, crochet the ribbing around the waist and finish with a round of slsts around the neck hole.
- If you want the sweater to be longer, just add rows on the front and back panel. The same you can do with the sleeves, if you want them longer.
- I recommend you watch my YouTube tutorial if there are any uncertainties.
Instructions
FRONT AND BACK PANEL (make 2)
Fdc 101
Row 1: ch 1, turn. Sc in every stitch across.
Row 2: ch 2, turn. *Fptc, dc* repeat from * to the last 2 sts, dc in the last 2 sts.
Row 3: ch 1, turn. Sc in every stitch across.
Row 4: ch 2, turn. *dc, fptc* repeat from * to the end, dc in the last st.
Row 5: ch 1, turn. Sc in every stitch across.
Repeat rows 2–5 until row 47. Row 47 will be row with fptcs and dcs.
Row 48: ch 2, turn. Dc in the 1st st, *bpdc, fpdc* repeat from * to the end, dc in the last st.
Row 49: ch 2, turn. Dc in the 1st st, *fpdc, bpdc* repeat from * to the end, dc in the last st.
Repeat rows 48 and 49 until row 54.
Finish off.
SLEEVES (make 2)
Fdc 52
Row 1: ch 2, turn (ch 2 counts as a stitch here and across). *Fpdc, bpdc* repeat from * to the end finishing with a dc in the space between the last stitch and the ch 2.
Row 2: ch 2, turn. *Bpdc, fpdc* repeat from * to the end finishing with a dc in the space between the last stitch and the ch 2.
Row 3: ch 2, turn. *Fpdc, bpdc* repeat from * to the end finishing with a dc in the space between the last stitch and the ch 2.
Repeat rows 2 and 3 until row 6.
Row 7: Ch 2, turn (ch 2 doesn’t count as a stitch here and across). Dc in 1st 2 sts, 2 dc in the front loop of the next st and 2 dc in the back loop of the same st. You have 4 dc sts in that st. *dc 3, 2 dc in the front loop of the next st and 2 dc in the back loop of the same st (you have 4 dc sts in that st)* repeat from * to the end finishing with a dc in the last st.
Row 8: ch 1, turn. Sc across.
Row 9: ch 2, turn. *Fptc, dc* repeat from * to the last 2 sts, dc in the last sts.
Row 10: ch 1, turn. Sc across.
Row 11: ch 2, turn. *dc, fptc* repeat from * to the end, dc in the last st.
Row 12: ch 1, turn. Sc in every stitch across.
Repeat rows 9–12 until row 53. Row 53 will be a row with fptcs and dcs.
Finish off.
ASSEMBLING
With a slst sew the shoulders together (right sides of front and back panel facing. Work 23 slsts on each side.
With a slst sew the sleeves on the body sides.
With a slst sew the sleeves and body sides together.
When you are done with the 2nd side don’t finish off, continue to work on the waist.
WAIST
Round 1: Ch 2 and with the wrong side facing work: *fpdc, bpdc, sk 2* repeat from * to the end, finishing with a bpdc. Slst in the space between ch 2 and 1st st to join.
Round 2: ch 2, turn. *Fpdc, bpdc( repeat from * to the end, finishing with a bpdc. Slst in the space between ch 2 and 1st st to join.
Repeat round 2 until round 7.
Finish off.
A tip: if you need a larger waist, work:
Round 1: Ch 2 and with the wrong side facing work: *fpdc, bpdc, fpdc, bpdc, sk 2* repeat from * to the end. Slst in the space between ch 2 and 1st st to join.
Round 2: ch 2, turn. *Fpdc, bpdc( repeat from * to the end. Slst in the space between ch 2 and 1st st to join.
Repeat round 2 until round 7.
Finish off.
NECKLINE
With a 5 mm hook attach the yarn in the center of the neck hole on the back panel. Ch 1 (counts as a stitch) slsts around the neck hole, slst in the ch 1 to join the round.
Finish off.
I love this pattern and just how calming the video is, I’m gonna try it myself, thank you for this amazing website!
Thank you! I’m glad you love the pattern and found the video calming. Enjoy trying it out, and feel free to reach out if you need any help.
thank you! You’re so kind 🙂