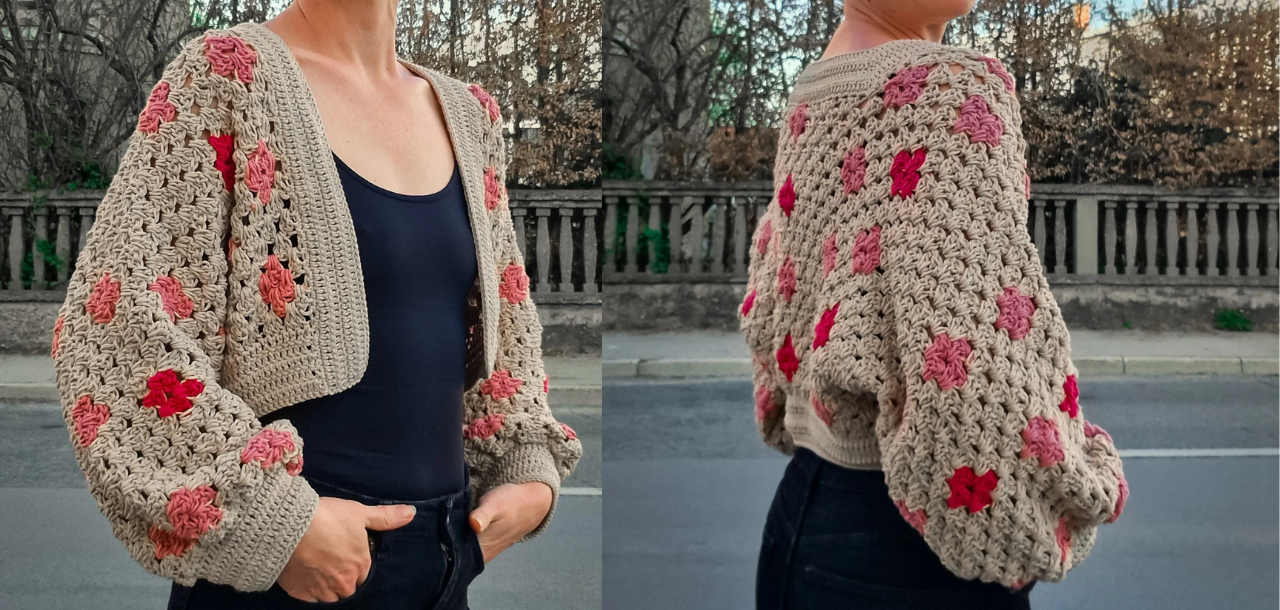
Diamond Delight Cardigan

29 Mar 2024 | Patterns | 3 comments

About the author: Karmen Režek

From Ljubljana, Slovenia, I aspire to inspire others with the same joy and fulfillment that crocheting has given me.

Need different sizes and more detailed instructions?

Get the full PDF for optimal viewing on any device or print.

Get ready to be dazzled because I’m here to unveil my newest creation: the “Diamond Delight Cardigan.” Drawing inspiration from the beloved Granny Diamond Stitch Cardigan, this piece is a fresh take on the classic, incorporating fewer diamonds and a streamlined color palette for a chic, contemporary look. Best of all, I’m offering the size XL pattern for free!
The Inspiration

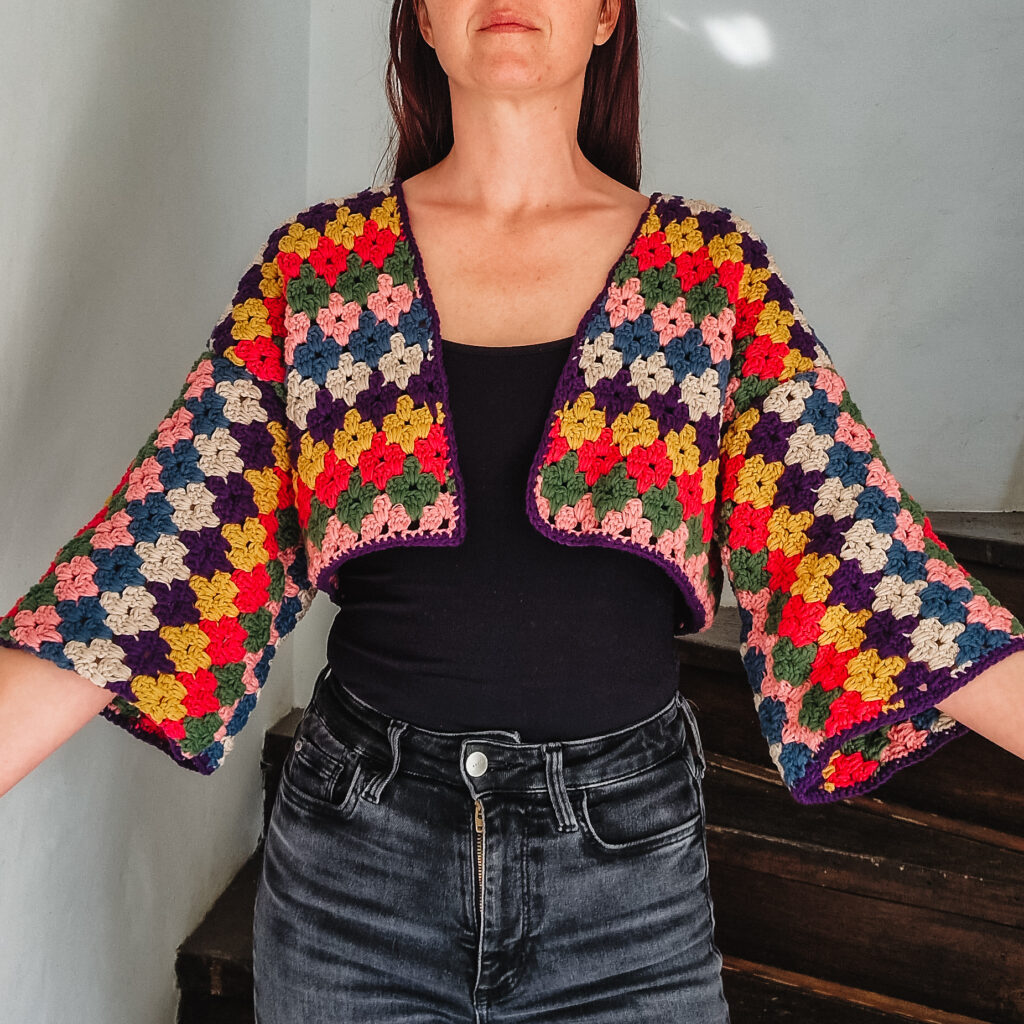
My journey started with the vibrant and intricate Granny Diamond stitch cardigan, a piece adorned with seven colors and rich in design. From there, the idea was born to craft something new yet familiar – a cardigan that blends simplicity with elegance. The Diamond Delight Cardigan emerged, a cropped, oversized gem that uses three stunning colors to bring its personality to life.
The Design

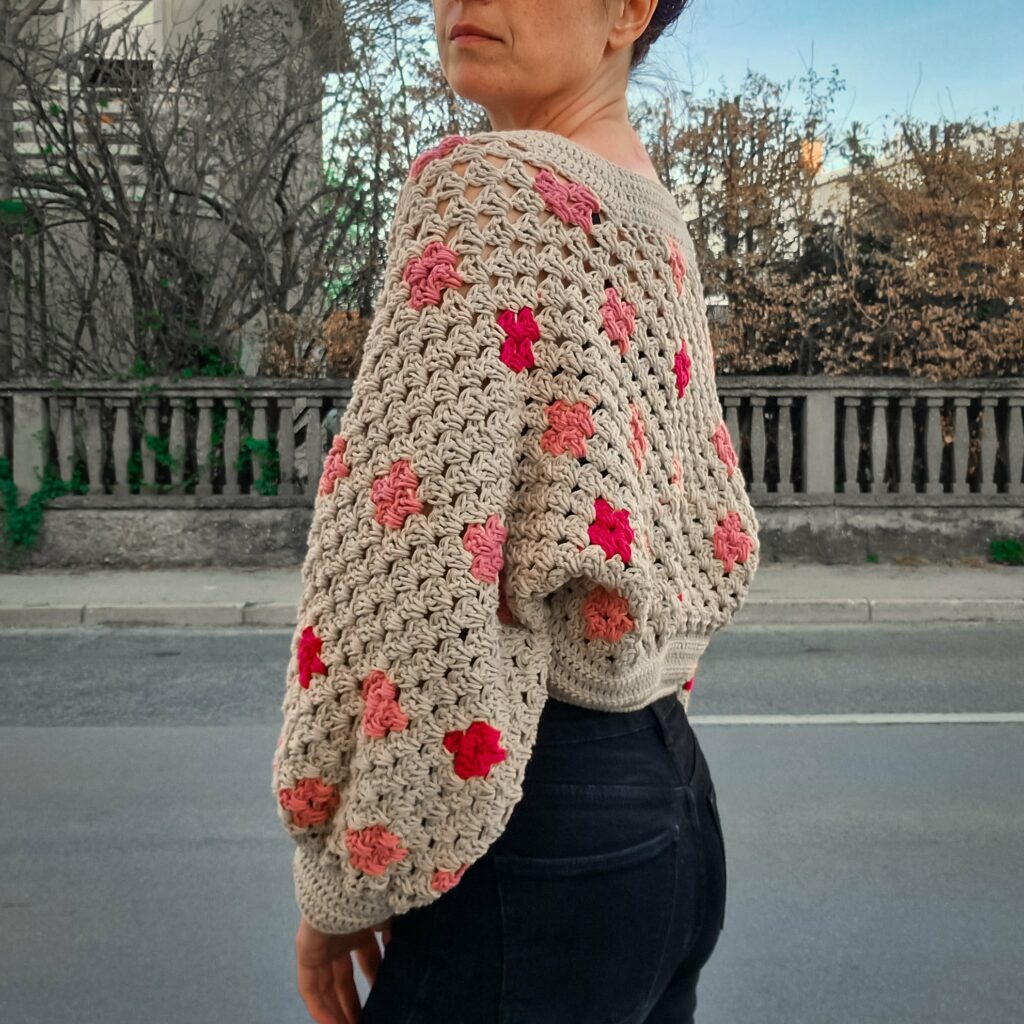
This cardigan is all about making a statement while keeping things straightforward. I used a base color of wheat, a neutral yet warm tone that sets the perfect canvas for the vibrant old pink and cherry diamond accents. The construction is refreshingly simple: it’s all crafted in one piece! You start with the waistband and back panel, seamlessly transitioning to the sleeves and front panels. Only minimal sewing is required, making it a delightfully direct path to a fabulous finish.

The Pattern

For those ready to embark on this crochet adventure, the pattern offers an intermediate challenge, promising both a fun process and a rewarding result. Available in my Ravelry or Etsy store (and free pattern for size XL at the end of this post), this detailed guide includes everything you need to create your own Diamond Delight Cardigan.

Materials and Tools

  • Yarn: DROPS PARIS in wheat, old pink, and cherry provides the perfect blend of comfort and color vibrancy.
  • Hooks: You’ll need sizes 3.5 mm and 6 mm to achieve the perfect texture and gauge.

Crochet with Color

The Diamond Delight Cardigan isn’t just about crafting; it’s about creating art. The granny diamond stitch remains at the heart of the design, allowing you to form beautiful diamond shapes that add a touch of sophistication to the overall piece.

Join the Crochet Journey

Embark on a crafting adventure with the Diamond Delight Cardigan, where every stitch brings you closer to creating something truly special. With its unique blend of simplicity and elegance, this pattern is destined to become a cherished piece in your crochet collection.

So, why wait? Dive into the world of diamonds and delight with this exquisite cardigan pattern. Happy crocheting, and here’s to bringing more beauty and warmth into our lives, one stitch at a time!

Difficulty

Intermediate.

Materials

yarn

A: DROPS PARIS, yarn group C (worsted), color 67 (wheat), 10 (11, 13, 15, 17) skeins

B: DROPS PARIS, yarn group C (worsted), color 59 (old pink), 1 (1, 2, 2, 2) skeins

C: DROPS PARIS, yarn group C (worsted), color 07 (cherry), 1 (1, 2, 2, 2) skeins

other

  • Hook:  3.5 and 6 mm
  • Yarn Needle, Scissors, Measuring Tape, Stitch Markers

Gauge

Body and sleeves

With 6 mm hook and any of the above yarns:

 ch 15

Row 1:  [Dc 2] in the 3rd ch from the hook, *sk 2, [dc 3] in the next ch. Repeat from * until 3 sts remain. Sk 2, dc 1 in the last ch.

Row 2: Ch 2 (counts as a dc here and throughout), turn. [Dc 2] in sp between the first two sts from the previous row. *Sk 3, [dc 3] in the sp between the last skipped st and the next. Repeat from * until 3 sts remain. Sk 2, dc 1 in the last st.

Repeat row 2 until row 7.

Finish off.

13 dc sts x 6.5 rows = 10 x 10 cm

Waistband and cuffs

3.5 mm hook and any of the above yarns:

18 dc sts x 9 rows = 10 x 10 cm

Finished sizes

XS, S, M, L, XL

Size Chart

SizeXSSMLXL
Chest/Bust73.583.594104114.25
Back Waist Length424343.544.545
Cross Back (shoulder to shoulder)36.2537.54042.544.5
Armhole Depth161718.2519.7521
Upper Arm25262830.534.5
Waist59.7565.573.58494

Stitch Key (US terminology)

  • ch = chain
  • chs = chains
  • yo = yarn over
  • sc = single crochet
  • sc2tog = single crochet two stitches together
  • sc3tog = single crochet three stitches together
  • sk = skip
  • st = stitch
  • sts = stitches
  • slst = slip stitch
  • slsts = slip stitches 
  • slst blo = slip stitch in the back loops only
  • sp = space
  • dc = double crochet 
  • dc2tog = double crochet two stitches together
  • dcs = double crochets 
  • RS = right side
  • WS = wrong side

Specialty Stitch & Technique Key

Granny Diamond Stitch

Explained in the pattern.

Notes

  • You will make a flat piece with a back panel, sleeves and both front panels. You will start with the waistband and back panel, adding the sleeves, finishing with front panels and waistband on the front panels. Lastly  you will sew the sleeves and body sides together and add the plackets and cuffs.

Instructions (size XL)

Waist

With yarn A and a 3.5 mm hook ch 99

Row 1: Dc in the 3rd ch from the hook and across.97

Row 2 – 5: ch 2 (doesn’t count as a st), turn. Dc across. 97

Do not cut off the yarn, continue to the “body” section.

Work with a 6 mm hook.

Row 1 (WS): [A] ch 2 (counts as a st here and throughout), turn. [Dc 2] in the 1st st, *sk 2, [dc 3] in the next st. Repeat from * until 3 sts remain. Sk 2, dc 1 in the last st.

Row 2 (RS): [A] Ch 2, turn. [Dc 2] in sp between the first two sts from the previous row, *sk 3, [dc 3] in the next sp*. [C] sk 3, [dc 3] in the next sp. [A] *sk 3, [dc 3] in the next sp* 6 times. [B] sk 3, [dc 3] in the next sp. [A] *sk 3, [dc 3] in the next sp* 6 times. [C] sk 3, [dc 3] in the next sp. [A] *sk 3, [dc 3] in the next sp* 6 times. [B] sk 3, [dc 3] in the next sp. [A] *sk 3, [dc 3] in the next sp* 6 times. [C] sk 3, [dc 3] in the next sp. [A] *sk 3, [dc 3] in the next sp*. Sk 2, dc in the last st. 

Row 3: [A] Ch 2, turn. [Dc 2] in sp between the first two sts from the previous row. [C] *sk 3, [dc 3] in the next sp* 2 times. [A] *sk 3, [dc 3] in the next sp* 5 times. [B] *sk 3, [dc 3] in the next sp* 2 times. [A] *sk 3, [dc 3] in the next sp* 5 times. [C] *sk 3, [dc 3] in the next sp* 2 times. [A] *sk 3, [dc 3] in the next sp* 5 times. [B] *sk 3, [dc 3] in the next sp* 2 times. [A] *sk 3, [dc 3] in the next sp* 5 times. [C] *sk 3, [dc 3] in the next sp* 2 times. [A] *sk 3, [dc 3] in the next sp*. Sk 2, dc in the last st. 

Row 4: [A] Ch 2, turn. [Dc 2] in sp between the first two sts from the previous row, *sk 3, [dc 3] in the next sp*. [C] sk 3, [dc 3] in the next sp. [A] *sk 3, [dc 3] in the next sp* 6 times. [B] sk 3, [dc 3] in the next sp. [A] *sk 3, [dc 3] in the next sp* 6 times. [C] sk 3, [dc 3] in the next sp. [A] *sk 3, [dc 3] in the next sp* 6 times. [B] sk 3, [dc 3] in the next sp. [A] *sk 3, [dc 3] in the next sp* 6 times. [C] sk 3, [dc 3] in the next sp. [A] *sk 3, [dc 3] in the next sp*. Sk 2, dc in the last st. 

Do not cut the yarn, but continue to row 5 for adding the sleeve.

Adding the left sleeve

Row 5: ch 32, turn. [A] Ch 2, turn. [Dc 2] in the 3rd ch from the hook. *Sk 2, [dc 3] in the next ch* 9 times. *Sk 2, [dc 3] in the next sp* 32 times. 

Do not finish off.

Adding the right sleeve

Add the chain for the right sleeve: take a shorter piece of yarn A (1 m long), attach the yarn in the ch 2 from the previous row and ch 30. Finish off.

Continue crocheting with the previous yarn to finish row 5: [A] *sk 3, [dc 3] in the 1st ch*. Sk 2, [dc 3] in the next ch* repeat across the chain. Sk 2, dc in the last ch. 

Continue working following the diagram:

  • 1 square = 3 dcs
  • ½ square = 1 dc 

When you’re done with the diagram, start crocheting the waistband on both front panels: 

Row 51 (3.5 mm hook): ch 2 (doesn’t count as a stitch here and throughout), turn. Dc in each st across. Ch 2 from the previous row counts as a st, so work one dc in that st too. (40 dc)

Row 52 – 55: ch 2, turn. Dc across. (40 dc)

Finish off.

Assembling

RS facing, sew the sleeves and body sides together with a slst. 

Placket

Yarn A: 

Row 1: RC facing, with a 3.5 mm hook and starting on the right placket, work 1 row of sc, continue working around the neckline and left placket. 2 sc sts in each dc row on the waistband, 3 sc sts in each dc row on the body and 2 sc sts in each dc st on the neck. 

Row 2: ch 2 (doesn’t count as a stitch here and throughout), turn. Dc until you reach the neckline corner, work dc2tog 2 times (in the 2 sts before the corner and in the 2 sts after the corner). Dc until you reach the second neckline corner, work dc2tog 2 times (in the 2 sts before the corner and in the 2 sts after the corner).

Row 3 – 5: ch 2, turn. Dc until you reach the neckline corner, work dc2tog in the st before the dc2tog from the previous row and in the next st, dc2tog in next 2 sts. Dc until you reach the second neckline corner, work dc2tog in the st before the dc2tog from the previous row and the next st, dc2tog in next 2 sts. Dc across. 

Row 6: ch 1, turn. Slst blo across.

Finish off.

Cuff

RS facing, 3.5 mm hook and yarn A:

Round 1: sc around the sleeve, working 3 sc sts in each dc row. Slst in the 1st st to join. 126

Round 2: ch 1, turn. * (Sc3tog) 3 times, sc2tog, sc* repeat around until 6 sts remain. (Sc3tog) 2 times. Slst in the 1st st to join. 52

Round 3 – 7: ch 2, turn. Dc around. Slst in the 1st st to join. 52

Round 8: ch 1, turn. Slst blo around. Slst in the 1st st to join. 52

Finish off.

Video tutorials

You’ll find just about every pattern I offer on my YouTube channel. This is because I want to share my love and knowledge for crochet as far and wide as I can!

Need different sizes and more detailed instructions?

Get the full PDF for optimal viewing on any device or print.

Join the Facebook group!

Crocheting is more fun if you do it with friends. Join the Facebook group to post your creations, get support, and more.

3 Comments

  1. Hi there, love this cardigan! I’m here from the blog hop. I clicked to get the XL pattern button, but it does give me the free option or a code to use. What am I doing wrong?

    Reply
    • Hi! The XL size pattern is available for free on the blog, and you can also purchase a PDF version for all sizes (including XL) in my Etsy or Ravelry store.

      Reply
      • I see! Thank you for the reply. ☺️

        Reply
Submit a Comment

Your email address will not be published. Required fields are marked *

Unlock Inspiration! ✨

Subscribe for fresh, unique pattern ideas and updates delivered to your inbox. For a limited time, you’ll receive a complimentary PDF pattern.

Success! You're now subscribed to receive emails from us.

Pin It on Pinterest

Share This