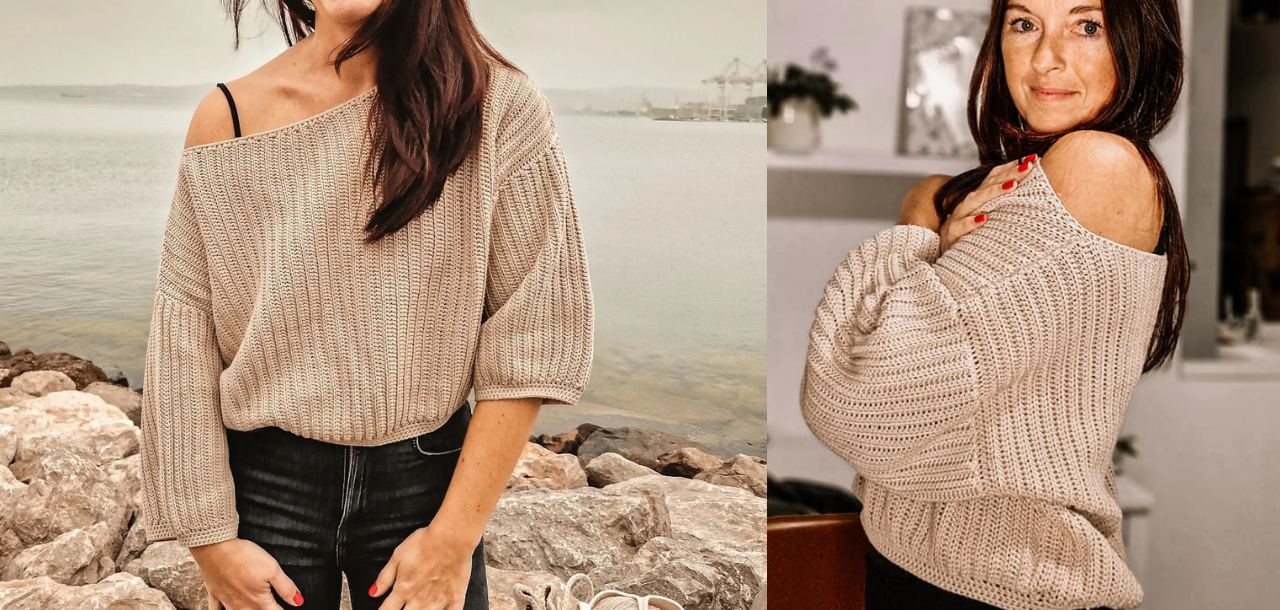
How to Crochet a Ribbed Sweater

22 Jul 2023 | Patterns | 12 comments

About the author: Karmen Režek

From Ljubljana, Slovenia, I aspire to inspire others with the same joy and fulfillment that crocheting has given me.

Need different sizes and more detailed instructions?

Get the full PDF for optimal viewing on any device or print.

Prefer visual instructions? No problem, watch the YouTube tutorial linked above.

Oversized, ribbed and ridiculously cozy, this ribbed sweater is the modern crochet sweater of your dreams! Learn how to crochet a sweater with knit-look ribbing by following the step-by-step video tutorial and free pattern below!

It’s a super easy knit-look crochet sweater pattern that’s both classy and beginner-friendly.

Key Highlights:

  • Oversized Comfort: Designed for ultimate coziness, its oversized fit ensures you’re wrapped in warmth and style.
  • Knit-Look Ribbing: Achieve that classic knit appearance with crochet techniques. The ribbing detail adds a sophisticated touch, making it stand out.
  • Beginner-Friendly: Whether you’re just starting out or have been crocheting for years, this pattern is crafted to be intuitive and easy to follow.
  • Step-by-Step Tutorial: Accompanied by a detailed video tutorial, you’ll be guided through each step, ensuring a seamless crafting experience.

Embrace the blend of comfort and style with this modern ribbed sweater. Perfect for chilly evenings or cozy weekends, it’s a must-have addition to your crochet collection.

Materials

  • DROPS Safran, color 64, yarn group A.
  • Hook: US G6 /4 .00 mm and D3/3 mm
  • Yarn Needle, Scissors, Measuring Tape

Of course you are more than welcome to use any yarn fiber that you wish. I think a nice wool blend or even an acrylic yarn would work wonders for the colder months ahead as long as it’s a sport weight yarn.

Stitch Key (US terminology)

  • ch = chain
  • hdc = Half Double Crochet
  • hdc blo = Half double Crochet in back loop only
  • st = Stitch
  • sts = stitches
  • sl st = Slip Stitch

Project level

Easy

Size

XS

Specialty Stitch & Technique Key

None

Notes

  • The ch 90  and ch 62 for the body and sleeves is  the length.
  • Crochet with a G6/4 mm hook unless the instructions are for a 3 mm hook size.
  • The ribbing on sleeves and body is worked in spiral rounds. Use a stitch marker to mark the first st in the round.
  • Ch 1 never counts as a stitch.

Instructions

Back panel

Ch 90 

Row 1: Hdc in 2nd ch from the hook and across. 

Row 2 – 90: Ch1, turn, hdc blo across. 

Front panel

Ch 90

Row 1: Hdc in 2nd ch from the hook and across. 

Row 2 – 22: Ch1, turn. Hdc Blo across. 

Row 23: Ch1, turn. Sl st in next 3 sts, ch1, hdc blo across.

Row 24 – 67: Ch1, turn. Hdc blo across. 

Row 68: Ch4, turn. Hdc in 2nd ch from the hook for the first 3 sts. Hdc blo across.  

Row 69 – 90: Ch1, turn. Hdc blo across. 

Sew the shoulders together with a sl st so that the stripes from the front and back panel continue nicely. 

Sleeve (make 2)

Ch 62 

Row 1: Hdc in 2nd ch from the hook and across. 

Rows 2 – 70: Ch1, turn. Hdc blo across.

Use the blanket stitch to attach the sleeves. 

With a sl st sew the sleeve and sides of the body.

Sleeve ribbing

Round 1: Work 1 hdc in each hdc row. Round 2 – 4:  with a D3/3 mm hook work 1 hdc in each st across. 

Finish off with a slst in the last st of the round and then make an invisible finish off (instructions in the video tutorial on my YouTube channel).

Body ribbing

Round 1: Work 1 hdc in each hdc row. 

Round 2 – 4: with a D3/3 mm hook work 1 hdc in each st across. 

Finish off with a slst in the last st of the round and then make an invisible finish off (instructions in the video tutorial on my YouTube channel).

Neck

Work 1 hdc evenly across the neck hole. Finish off.

Video tutorials

You’ll find just about every pattern I offer on my YouTube channel. This is because I want to share my love and knowledge for crochet as far and wide as I can!

Need different sizes and more detailed instructions?

Get the full PDF for optimal viewing on any device or print.

Join the Facebook group!

Crocheting is more fun if you do it with friends. Join the Facebook group to post your creations, get support, and more.

12 Comments

  1. I am unsure what size xs is, can you please specify a finished size as xs is very vague. this could be achieved by either by the finished measure or a specific size .

    Reply
    • Thank you for reaching out! I understand the need for clarity when it comes to sizing. The size XS, as mentioned in the pattern, corresponds to specific measurements based on the Craft Yarn Council’s standards. Here are the details for size XS:

      Chest (inches): 28–30
      Center Back Neck–to–Wrist (inches): 26–26½
      Back Waist Length (inches): 16½
      Cross Back (Shoulder to shoulder, inches): 14–14½
      Arm Length to Underarm (inches): 16½
      Upper arm (inches): 9¾
      Armhole depth (inches): 6–6½
      Waist (inches): 23–24
      Hips (inches): 33–34

      For a comprehensive understanding of the sizes and their corresponding measurements, you can refer to the Craft Yarn Council’s Woman Size Charts. I hope this helps clarify the sizing for you!

      Reply
  2. Good morning,
    Love, love , love the sweater. I’m a beginner, but I feel like I could do this, only one problem. Not my size, and I’m on a fixed income so I can’t afford to buy the size I need.
    I would think if this is a blog hop, you would make ALL sizes available.
    Thank you for your time and sharing your talent.

    Reply
    • Hello Carol,

      Thank you for your kind words and appreciation for the sweater design. I’m glad to hear that you feel confident in trying it out as a beginner!

      I understand your concerns regarding the sizing. Creating patterns for multiple sizes requires a lot of time, effort, and testing to ensure accuracy and fit. While I strive to provide as much free content as possible, there are costs associated with maintaining the blog, creating content, and testing patterns.

      However, I feel now is the right time to mention my newsletter. By subscribing, you can get a 50% off discount on patterns, and there’s a possibility I may release this pattern for free in the future. I rarely send out emails, so I’m sure it’ll be worth it to you.

      I’ll take your feedback into consideration for future projects and try to include a wider range of sizes when possible. In the meantime, there are many resources online that can guide you on adjusting patterns to fit different sizes.

      Thank you for understanding and for your support.

      Reply
  3. This is a beautiful pattern. Thank you for sharing your talent with your readers!

    Reply
    • Thank you so much for your kind words! I’m grateful you appreciate the pattern. It’s a joy to share my passion and creations with wonderful readers like you.

      Reply
  4. Are You not offering a free PDF for the blog hop? Thanks!

    Reply
    • Hi Teresa,

      Thank you for reaching out! For this particular blog hop, we’re not offering a free PDF. However, the Ribbed Sweater pattern is quite straightforward and versatile, making it easy to adjust to your desired size. If you have any questions or need guidance on adjustments, feel free to ask. I’m here to help!

      Reply
  5. Cute, but not a style for me. Could the neckline be made tighter so it doesn’t fall off the shoulder ?

    I really like the look of the green one. How do you get the sleeves to stay like that? Are they ribbed at the ends, or did you use a separate band to tuck them up?

    Reply
    • Thanks for your feedback!

      To adjust the neckline for a tighter fit, you can easily add more rows to the shoulders, instead of on the neckline.

      As for the green sweater, the sleeves naturally stay in place without any ribbing at the ends or a separate band. The fit you see is achieved by using a smaller size, as that’s her preference.

      I hope this helps! Let me know if you have any more questions.

      Reply
      • Hello,

        Love the minimalist design and would love to make it but you don’t seem to mention how much yarn you would need for this size.
        I would like to avoid the dreaded miscalculation of ‘if only I ordered another ball’ drama. Thank you.

        Reply
        • Hey Amy, I’m just seeing this now. Thank you for your kind words and interest in the ribbed sweater design! I apologize for not specifying the yarn quantity. For the size shown, you will need approximately 450 grams of yarn. If you have any more questions or need further assistance, I’m here!

          Reply
Submit a Comment

Your email address will not be published. Required fields are marked *

Unlock Inspiration! ✨

Subscribe for fresh, unique pattern ideas and updates delivered to your inbox. For a limited time, you’ll receive a complimentary PDF pattern.

Success! You're now subscribed to receive emails from us.

Pin It on Pinterest

Share This