How to Crochet an Oversized Mesh Stitch Top

22 Jul 2023 | Patterns | 3 comments

About the author: Karmen Režek

From Ljubljana, Slovenia, I aspire to inspire others with the same joy and fulfillment that crocheting has given me.

Need different sizes and more detailed instructions?

Get the full PDF for optimal viewing on any device or print.

Prefer visual instructions? No problem, watch the YouTube tutorial linked above.

If you are looking for a modern crochet top pattern, you found it. 

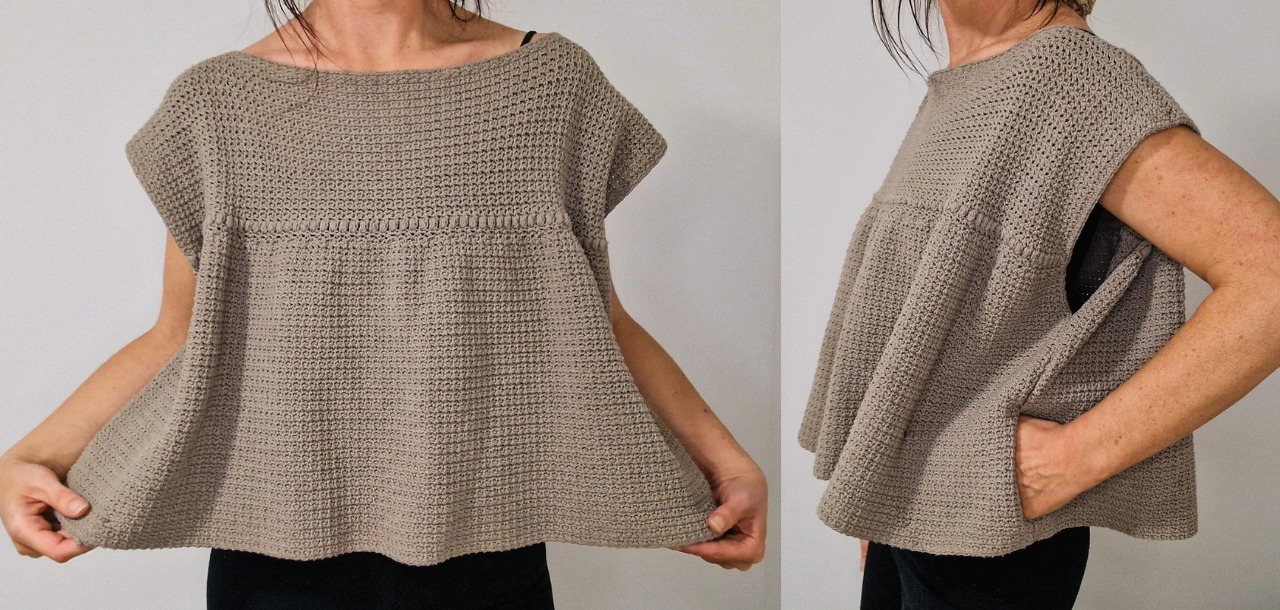
I used a single crochet mesh stitch and puff stitch combined to make a cozy cropped top for spring and summer! It`s made for sizes XS to XXL.

The top is made of the back and front panel and has two pockets from the body sides. If you prefer the top without the pockets, no problem, just don`t make them. You can also adjust the length of the top by adding or removing the rows.

Materials

  • YARN: DROPS LOVES YOU 9, yarn group A, color 105
  • Hook:  4 mm/G-6
  • Yarn Needle, Scissors, Measuring Tape

Size

Small

Stitch Key (US terminology)

  • ch = chain
  • sc = single crochet 
  • sk = skip
  • st = stitch
  • sts = stitches
  • slst = slip Stitch
  • slsts = slip Stitches
  • MS = single crochet mesh stitch
  • INC = mesh stitch increase 
  • PS = puff stitch 
  • hdc = half double crochet 
  • dc = double crochet 

Specialty Stitch & Technique Key

SINGLE CROCHET MESH STITCH 

1. Even number of chains. You will start working in the second chain from your hook.

2. Make a single crochet in the second chain from your hook (in the back of the chain).

3. Then chain one.

4. Skip one stitch and make a single crochet.

5. Then chain one, skip one stitch and make a single crochet.

6. Keep working in the same way until the end of the row.

7. Then make a single crochet in the last stitch.

8. Chain one.

9. Turn your work around.

10. Make a single crochet in the very first stitch (in the single crochet of the previous row). Chain one.

11. Then skip one stitch and make a single crochet.

12. Keep working in the same way until the end of the row. You should always make a single crochet in the single crochet of the previous row. Keep repeating row two until you reach the desired size.

13. This stitch looks the same on both sides.

SINGLE CROCHET MESH STITCH INCREASE 

You will make an increase in every 2nd sc from the previous row starting in the 1st st. One increase goes in the front loop of the stitch and the second goes in the back loop of the same stitch. You make a sc in the front loop of the sc and ch1 , sc in the back loop of the same sc and ch1. 

PUFF STITCH 

*YO, insert your hook and pull up a loop. Repeat from * 3 more times, inserting your hook into the same space, YO and pull through all loops.

Notes

  • The top is made of two panels (front and back).
  • If you want the top to be longer just add rows to the front and back panel. 
  • It’s crocheted from top to bottom.
  • I recommend you watch my YouTube tutorial if there are any uncertainties, especially with assembling. 

Instructions (size S)

Front and back panel (make 2)

Ch 146

Row 1: sc in the 2nd ch from the hook, ch 1, sk 1, *sc, ch 1, sk 1* continue across and make a sc in the last ch. 

Row 2 – 32: ch 1, turn. Sc in the 1st st, ch 1, sk 1, *sc, ch 1, sk 1* repeat across and make a sc in the last st.

Row 33 (a row of puff stitches): ch 1, turn. 

You will be working in sc sts of the previous row. So make a PS in the 1st st, ch 1, sk 1, *PS, ch 1, sk 1* repeat across and make the last PS in the last st of the row (don’t ch 1 here). 

Row 34: ch 1, turn. Sc in the 1st st, ch 1, sk 1, *sc, ch 1, sk 1* repeat across and make a sc in the last st. 

Row 35: ch1, turn. Make an INC in the 1st st ( see special stitches above) then *sk1, sc in the next sc, ch1, INC in the next sc* repeat across. Sizes XS and S will finish with an INC in the last st, other sizes will finish with a sc in the last st.

For the last INC for sizes XS and S in the last st you make: sc in the front loop, ch1 sc in the back loop.

Row 36 – 96: ch 1, turn. Sc in the 1st st, ch 1, sk 1, *sc, ch 1, sk 1* repeat across and make a sc in the last st.

Finish off.

Pockets 

Ch 23 

Row 1: sc in 2nd ch from the hook and across. 

Row 2 – 27: ch 1, turn. Sc across.

Row 28: ch 1, turn. Sc in 1st 6 sts, hdc in next 8 sts, dc in remaining 8 sts.

Finish off and make 3 more pieces.

Assembling

With right sides facing, sew the shoulders together with a slst. First slst goes in the 1st sc of the panels, 2nd slst goes in ch 1 space… The neck hole should be 34 cm wide. 

When you are finished with sewing the shoulders together, start with a row of scs on the sides of the panels, that’s 1 sc in each row. Make sure you are crocheting with the right side facing you. 

With a sc sew the front panel of the pocket (the side with dcs and hdcs. Be sure to position the hdc/dc corner on top/bottom) to the front panel of the body, so that the pocket panel is on the wrong side of the body panel and you crochet both layers together so that the right side of the body is facing you. The bottom of the pocket panel is placed 10 sts from the bottom edge. 

Repeat the process for the back panel and back body panel. 

Now sew back and front pocket panels with a sc, crocheting 3sc in both corners. 

Pin the pocket on the front panel by making two or more knots.

Finish with sewing together the body panels with a slst. Be careful that you sew well, not leaving any holes where the pocket is.

Repeat the process on the other side. 

Neckline

Sc around  the neckline and finish off. You can also make a round of slsts after the round of scs if you want the neckline to be smaller. 

Video tutorials

You’ll find just about every pattern I offer on my YouTube channel. This is because I want to share my love and knowledge for crochet as far and wide as I can!

Need different sizes and more detailed instructions?

Get the full PDF for optimal viewing on any device or print.

Join the Facebook group!

Crocheting is more fun if you do it with friends. Join the Facebook group to post your creations, get support, and more.

3 Comments

  1. I love this too ssssooooo much! This pattern is SO simple and easy to read and the top is ADORABLE! Nice and breathable! It has a lot of give to it! It’s a simple two panel top so it’s very easy to complete! I’d say with the stitch instructions, a beginner could DEFINITELY learn a thing or two OR THREE from this pattern.

    Reply
  2. The Oversized Mesh Stitch Top is a must have if you are looking for a comfortable yet stylish tee. Aside from an easy to follow pattern, the design is fashionable too! I also love that there is a youtube version too for the more visual learners if you would require some guidance along the way. Cheers Karmen!!!

    Reply
  3. I dont know what to say for this top! It has style! It is comfortable, cozy, perfect for spring – summer!! I paired it with jeans and loved the look!! As for the pattern very easy to follow!! Thank you!!!

    Reply
Submit a Comment

Your email address will not be published. Required fields are marked *

Unlock Inspiration! ✨

Subscribe for fresh, unique pattern ideas and updates delivered to your inbox. For a limited time, you’ll receive a complimentary PDF pattern.

Success! You're now subscribed to receive emails from us.

Pin It on Pinterest

Share This