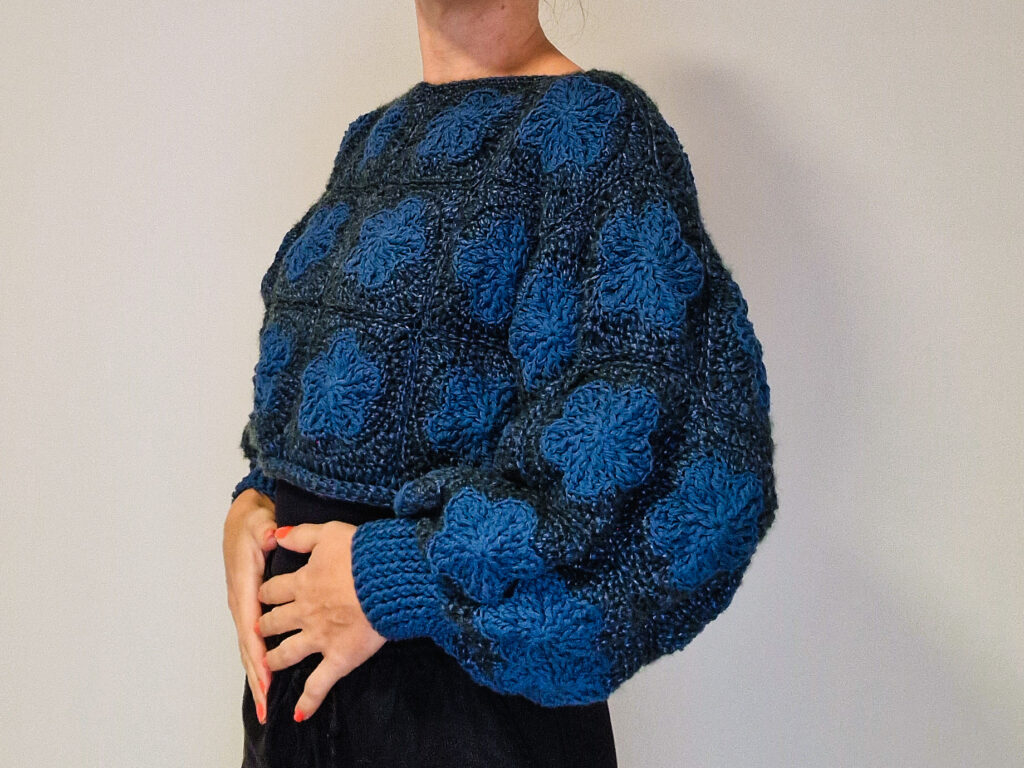
How to crochet the Flower Granny Square Sweater

18 Oct 2023 | Patterns | 0 comments

About the author: Karmen Režek

From Ljubljana, Slovenia, I aspire to inspire others with the same joy and fulfillment that crocheting has given me.

Need different sizes and more detailed instructions?

Get the full PDF for optimal viewing on any device or print.

Hello, crochet enthusiasts! 🌸 Today, I’m thrilled to share with you my latest creation – the Flower Granny Square Sweater. This sweater is a beautiful blend of vintage charm and modern style, and I’m sure you’ll fall in love with it just as I have.

About the Sweater: The Flower Granny Square Sweater is crafted from individual granny squares, each seamlessly sewn together using an invisible seam technique. This ensures a polished and refined look that’s sure to turn heads. The puffy sleeves add a touch of vintage flair, while the narrow and elongated cuffs give it a contemporary edge. Its cropped design ensures versatility, making it a perfect addition to any wardrobe.

One of the best things about this sweater is its adaptability. Depending on the yarn you choose, it can be perfect for a chilly winter day or a cool summer evening. So, it’s a sweater for all seasons!

Pattern Details: For those of you eager to recreate this sweater, I’ve included the pattern for size XXS/XS/S at the end of this blog post. The pattern is easy to follow, and accompanied by pictures to guide you through each step.

Materials:

  • Yarn A: Metallico Hobbii (70% polyamide, 20% acrylic, 10% merino wool). Hook: 3-3.5 mm. Color: 8.
  • Yarn B: DROPS LOVES YOU 7 (100% cotton). Hook: 3.5 mm. Color: 28.
  • For size XXS/XS/S: 8 skeins of Yarn B and 5 skeins of Yarn A.
  • Additional tools: 5 mm hook, yarn needle, scissors, measuring tape, and stitch markers.

Finished Sizes on the PDF pattern: Available in XXS/XS/S, M/L/XL, 2XL, 3XL/4XL.

Stitch Key & Techniques: The pattern includes a comprehensive stitch key and special technique instructions, ensuring clarity and ease of understanding. From basic stitches like chain (ch) and single crochet (sc) to specialty stitches like the invisible join and invisible seam, everything is covered.

Tip: If you find any steps challenging, don’t hesitate to check out my YouTube tutorial for clear guidance.

Let’s Get Crocheting! I’m so excited for you to embark on this crochet journey with the Flower Granny Square Sweater. Whether you’re making it for yourself or as a gift for someone special, I’m sure it’ll be a cherished piece. Happy crocheting! 🧶

Materials

  • YARN:

Yarn A: Metallico Hobbii, 70% polyamide, 20% acrylic, 10% merino wool, 50g (1.75 oz), 265 m (289 yds), hook: 3-3.5 mm, UK: 10 (US: 3), color 8

Yarn B: DROPS LOVES YOU 7, 100% cotton, classic 8/4 cotton, yarn group A, hook: 3.5 mm, 50 g (1.8 oz), 170 m (185 yds), color 28

  • XXS/XS/S: 8 skeins (yarn B), 5 skeins (yarn A)
  • Hook:  5 mm
  • Yarn Needle, Scissors, Measuring Tape, Stitch Markers

Finished sizes

XXS/XS/S, M/L/XL,2 XL,3XL/4XL

Size chart

Cross Back (Shoulder to Shoulder): 38, 44, 47

Back Waist Length: 43, 45, 46.5

Armhole depth: 17, 21, 25

Waist: 66, 94, 119

Finished measurements

Cross Back (Shoulder to Shoulder): 46, 58, 69

Back Waist Length: 42.5, 54, 54

Armhole depth: 29, 29, 34.5

Center Back Neck to Wrist: 66, 73, 79

Stitch Key (US terminology)

  • ch = chain
  • st = stitch
  • sts = stitches
  • slst = slip stitch
  • slsts = slip stitches
  • fpslst = front post slip stitch 
  • sc = single crochet 
  • sc 3 = single crochet in next three stitches
  • sc2tog = single crochet two stitches together 
  • hdc = half double crochet 
  • hdc 3 = half double crochet in next three stitches 
  • hdcblo = half double crochet back loop only 
  • dc = double crochet
  • dc3tog = double crochet three stitches together 
  • dc2tog = double crochet two stitches together 
  • fpdc = front post double crochet
  • 2 fpdc = two front post double crochet stitches in one stitch 
  • fpdc 2 = front post double crochet in next two stitches
  • fpdc2tog = front post double crochet three stitches together 
  • edc = extended double crochet  
  • edcblo = extended double crochet back loop only 
  • fptc = front post treble crochet
  • tcblo = treble crochet back loop only 
  • 3 fptc = three front post treble crochet stitches in the next stitch 
  • MR = magic ring 

Specialty Stitch & Technique Key

Invisible join

Pull the loop on the hook a little longer, remove the loop from the hook, insert the hook in the 2nd st from the back, take the loop through that st. Now continue on to the next round.

Invisible seam 

Step 1:

Hold your squares together with the right sides facing each other.

Step 2:

Begin in the corners by inserting your yarn needle into the front loop of the square closest to you and the back loop of the other.

Step 3:

Insert your tapestry needle in the back loop of the next stitch of the square furthest away from you and the front loop of the other square.

Step 4:

Insert your tapestry needle into the front loop of the next stitch of the square closest to you and the back loop of the other square.

Step 5:

Continue repeating step 3 and 4 until you reach the end.

Notes

  • Ch 2 doesn’t count as a stitch unless it says otherwise. 
  • Granny squares are worked in joined rounds with invisible join. 
  • Crochet using two yarn strands held together
  • If you find any steps challenging, I suggest checking out my YouTube tutorial for clear guidance.

Instructions

Flower Granny Square 

Yarn B:

Round 1: MR, ch 2, 10 dc in the MR. Join with invisible join. 

Round 2: ch 2, 2 fpdc in the 1st st and around. Join with a fpslst in the 1st st of this round and continue on to the next st for round 3. 

Petals

Round 3: *[fpdc, fptc] in the next st, 3 fptc in the next st, [fptc, fpdc] in the next st, fpslst in the next st* repeat 4 more times. The last slst will be in the 1st slst of the round. 

Finish off. 

Yarn A:

Border

Attach the yarn in the 1st  Fptc in the 3 fptc group and ch 1, but only in the back loop. 

Round 1: blo hdc in the same st and in the next 2 sts *(hdcblo 3), dcblo in the next st, edcblo, tcblo, edcblo, dcblo* repeat 4 more times. Join with invisible join in the 1st st of the round. 

Round 2: ch 4, tc in the same st, [edc, dc] in the next st, dc in the next st, hdc in the next st, sc 3, hdc in the next st, dc in the next st, [dc, edc] in the next st, *[tr, ch 1, tc], [edc, dc], dc, hdc, sc 3, hdc, dc, [dc, edc]* repeat 2 more times. Slst in ch 1 sp to join.

Finish off. 

You will need a total of 54 flower granny squares. 

Body

With invisible seam sew together 12 granny squares for the front and 12 granny squares for the back panel. 

Sleeves 

With invisible seam sew together 15 granny squares for each sleeve. 

Assembling 

Shoulders 

With invisible seam sew the shoulders together. The recommended neck opening is 28 cm. Feel free to adjust these measurements for a custom fit as per your preference.

With invisible seam sew the sleeves on the body. 

With invisible seam sew the sleeves and the body sides together. 

Cuff

With yarn B:

Attach the yarn in the ch 1 right before the seam from sewing the sleeves and body sides. You will be working in 75 sts around the sleeve. 

Round 1: ch 2, dc3tog in 1st 3 sts and around. Invisible join to join the round.

Round 2 – 9: ch 2, fpdc in the 1st st and around. Invisible join to join the round.

Finish off. 

Tip: To achieve a longer sleeve length, simply add additional rounds following Round 9.

Neckline 

One strand of yarn A and one strand of yarn B:

Right side facing, attach the yarn in the ch 1 right before the shoulder seam.

Ch 1, sc2tog in 1st 2 sts (the ch 1 where you attached the yarn and the next ch 1), sc around until you reach the other side, sc2tog in next 2 sts (the ch 1 where you attached the yarn and the next ch 1), sc around. Slst  in the 1st st to join the round. 

Waist

One strand of yarn A and one strand of yarn B. You will be working in 120 sts around the waist. 

Right side facing, attach the yarn in the ch 1 right before the side seam of the body:

Round 1: ch 2, dc in the st where you just attached the yarn and around, invisible join to join the round.

Round 2: ch 2, *fpdc 2, fpdc2tog* around. Invisible join to join the round. 

Round 3 – 5: ch 2, fpdc in the 1st st and around. Invisible join to join the round.

Finish off. 

Tip: To achieve a longer length, simply add additional rounds following Round 5.

Video tutorials

You’ll find just about every pattern I offer on my YouTube channel. This is because I want to share my love and knowledge for crochet as far and wide as I can!

Need different sizes and more detailed instructions?

Get the full PDF for optimal viewing on any device or print.

Join the Facebook group!

Crocheting is more fun if you do it with friends. Join the Facebook group to post your creations, get support, and more.

0 Comments

Submit a Comment

Your email address will not be published. Required fields are marked *

Unlock Inspiration! ✨

Subscribe for fresh, unique pattern ideas and updates delivered to your inbox. For a limited time, you’ll receive a complimentary PDF pattern.

Success! You're now subscribed to receive emails from us.

Pin It on Pinterest

Share This