How to crochet the Ruffle Raglan Crochet Sweater 

14 Oct 2023 | Patterns | 0 comments

About the author: Karmen Režek

From Ljubljana, Slovenia, I aspire to inspire others with the same joy and fulfillment that crocheting has given me.

Need different sizes and more detailed instructions?

Get the full PDF for optimal viewing on any device or print.

Prefer visual instructions? No problem, watch the YouTube tutorial linked above.

A Blend of Style and Comfort

A Sweater Like No Other
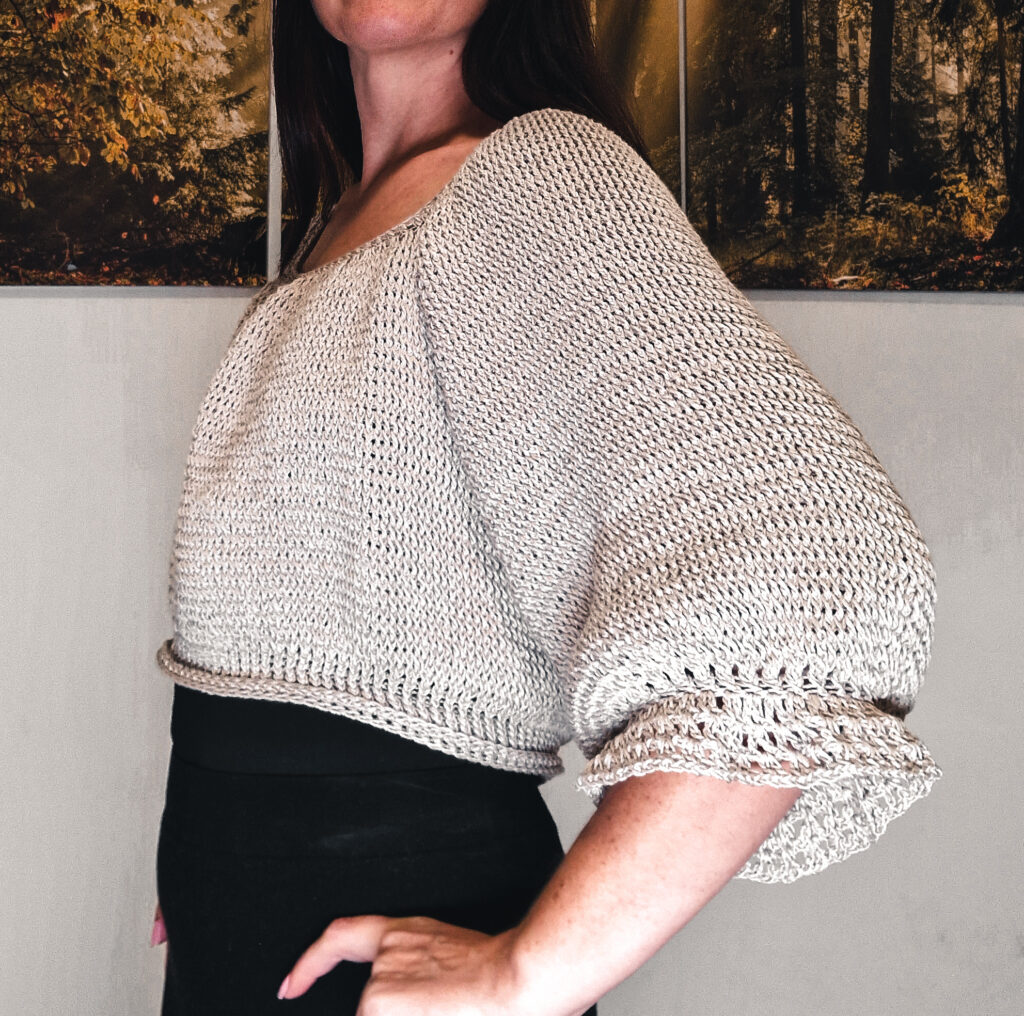
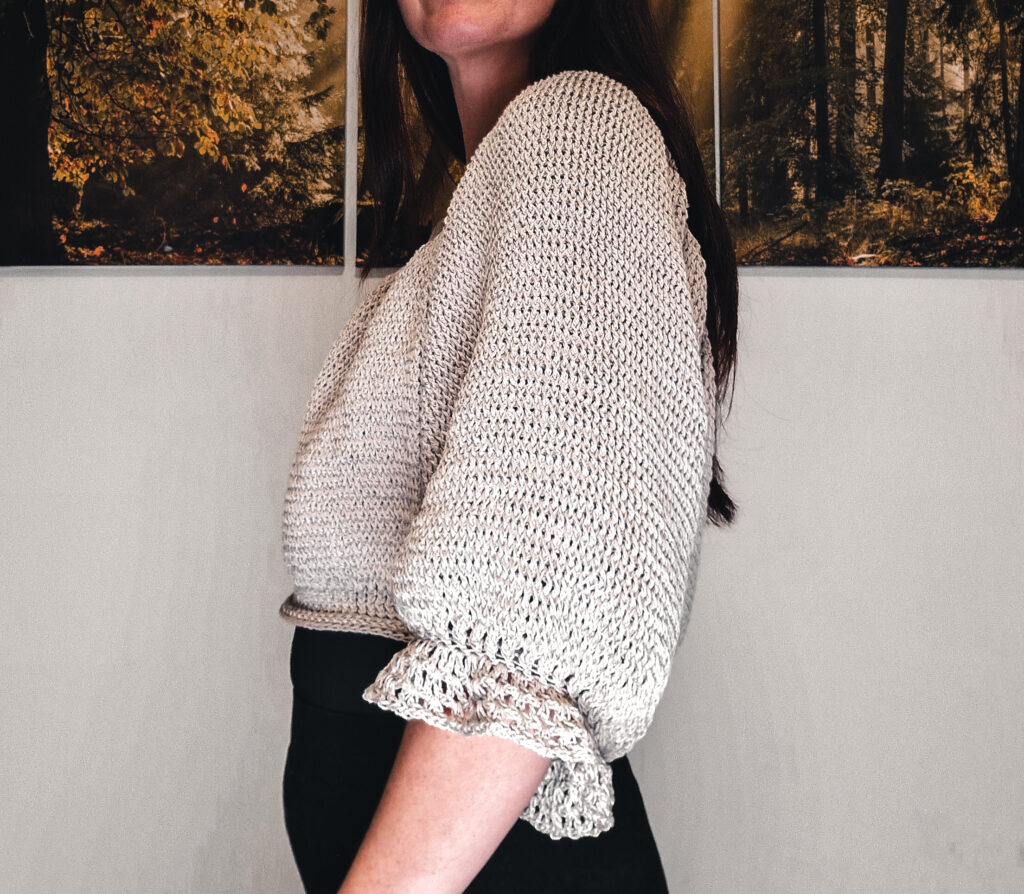
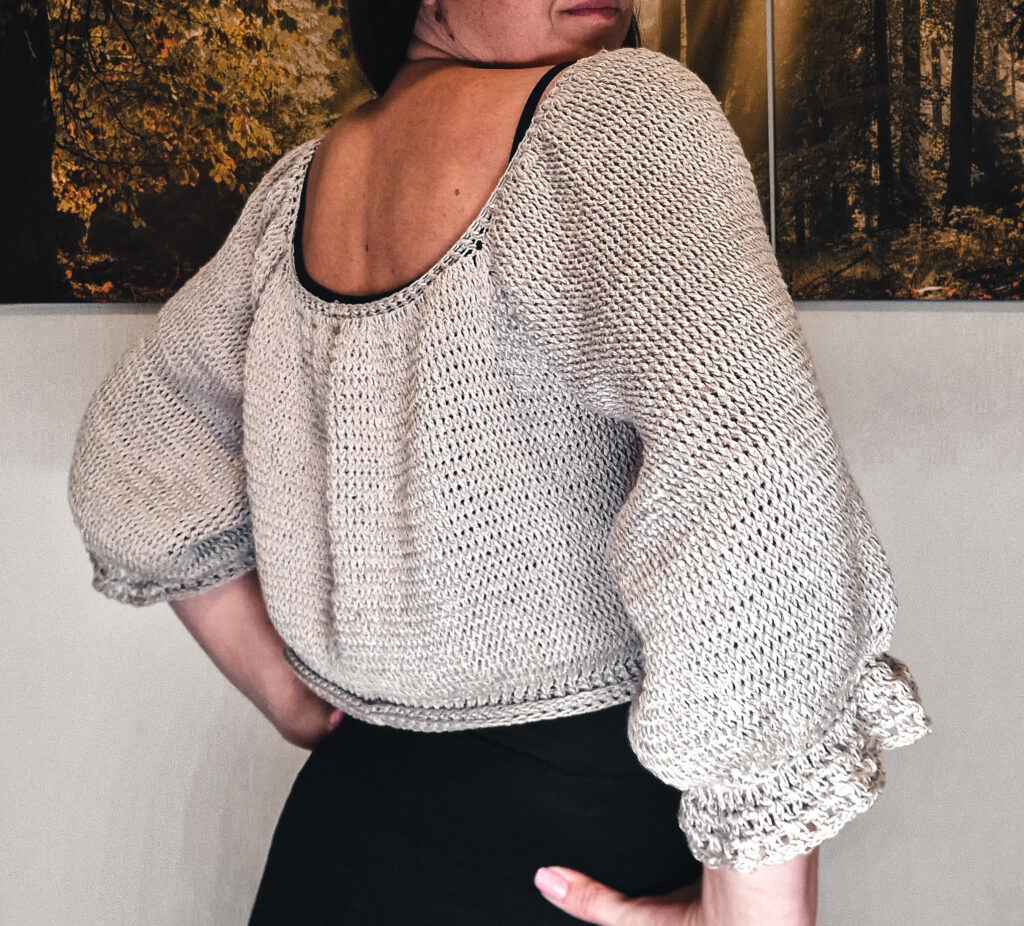
Meet the Ruffle Raglan Crochet Sweater – a chic and comfortable addition to your wardrobe. With its cropped length, puffy sleeves, and delightful ruffles on the cuffs, this sweater is a unique and stylish piece perfect for the transitional weather.

Crafted with New Arezzo Yarn

This exquisite sweater is crocheted using New Arezzo yarn, a luxurious blend of cotton, bamboo, and linen. This combination of fibers results in a garment that is breathable and lightweight, making it ideal for cooler spring or fall days. For those who desire a warmer version for winter, simply choose a yarn blend more suitable for colder temperatures, and you’ll have a cozy and warm sweater ready to wear.

Raglan Style Sweater: Timeless and Trendy

Designed in the timeless raglan style, the sweater features diagonal seams extending from the neckline to the underarms, offering a comfortable and flattering fit for all body types.

Front Post Double Crochet Stitch: Mimicking the Knit Look

The use of the Front Post Double Crochet (FPDC) stitch gives this sweater a knit-like appearance, adding to its unique and intricate texture. The FPDC is not only visually appealing but also contributes to the sweater’s comfort and style.

Mastering the Front Post Double Crochet Stitch: Step-by-Step

1. Start with a Double Crochet (DC) row: Begin by making a regular double crochet stitch.

2. Insert the Hook: Insert it from front to back around the post of the DC from the previous row.

3. Complete the Stitch: Yarn over and pull up a loop, then complete the stitch as you would a regular DC.

With a bit of practice, you’ll master this technique, unlocking a world of possibilities for texture in your crochet projects.

Exclusive Free Pattern for Size Small

I am sharing a free pattern for the Ruffle Raglan Crochet Sweater in size small. This exclusive offer allows you to experience the joy of creating this beautiful piece yourself.

Materials

  • YARN: New Arezzo / 47% bamboo, 33% linen, 20% cotton / fine
  • Size XS/S: 600 g / 21.5 oz, 1800 m / 1968 yds
  • Size M/L: 750 g / 26.5 oz, 2250 m / 2461 yds
  • Size XL: 850 g / 30 oz, 2550 m / 2789 yds
  • Size 2XL: 900 g/ 32 oz, 2700 m / 2953 yds
  • Hook:  4 mm
  • Yarn Needle, Scissors, Measuring Tape, Stitch Markers

Size Chart

 XS, S, M, L, XL, 2XL

Chest/Bust (in cm): 73.5, 83.5, 94, 104, 114.5, 125

Back Waist Length (in cm): 42, 43, 43.5, 44.5, 45, 45.5

Cross Back (shoulder to shoulder) (in cm): 36.5, 37.5, 40, 42.5, 44.5, 45.5

Armhole Depth (in cm): 16, 17, 18.5, 19.5, 21, 22.5

Waist (in cm): 60, 65, 73, 84, 94, 104                                                                                   

Stitch Key (US terminology)

  • ch = chain
  • yo = yarn over
  • st = stitch
  • sts = stitches
  • sl st = slip stitch
  • sl sts = slip stitches 
  • dc = double crochet
  • 2 dc = two double crochet stitches in one stitch 
  • 4 dc = four double crochet stitches in one stitch 
  • fpdc = front post double crochet 
  • 2 fpdc = 2 front post double crochet stitches in one stitch
  • 4 fpdc = 4 front post double crochet stitches in one stitch
  • fpdc 2 = front post double crochet in next two stitches
  • fpdc2tog = front post double crochet two stitches together 
  • fpdc3tog = front post double crochet three stitches together 
  • fdc = foundation double crochet 
  • sp = space

Specialty Stitch & Technique Key

Invisible join: pull the loop on the hook a little longer, remove the loop from the hook, insert the hook in the 2nd st from the back, take the loop through that st. Now continue on to the next round.

Notes

  • Foundation chain counts as row 1
  • You will start working around the neck in joined rounds (it’s a raglan style sweater, one piece, no sewing), leaving the holes for the sleeves/armholes, working on the body and finishing with the sleeves. 
  • It’s crocheted from top to bottom. 
  • You can make the sweater longer. Instructions are in the pattern in the section for body. 
  • You can make the sleeves longer. Instructions are in the pattern in the section for the sleeves. 
  • Ch 2 doesn’t count as a stitch. 
  • I recommend you watch my YouTube tutorial if there are any uncertainties. 

Instructions

Fdc 103

Invisible join: with this join you will make 104th dc. 

1. Yo, insert hook in the foundation chain, yo and pull through, insert hook in the very 1st foundation chain, yo and pull through both chains (you just made a sl st). 

2. Now you just need to finish the last dc: yo and pull through 2 loops, yo and pull through 2 loops. 

3. Now you need to join the upper part of the chain with invisible join: pull the loop on the hook a little longer, remove the loop from the hook, insert the hook in the 2nd st from the back, take the loop through that st. Now continue onto round 2.

For round 2 you will first place stitch markers in the corner stitches:

  1. Place the 1st stitch marker in 14th
  2. 2nd stitch marker in 26th, 
  3. 3rd stitch marker in the 26th and 
  4. 4th stitch marker in the 26th. (The long loop that you made with invisible join also counts as a stitch)

Round 2: ch 2, 2 dc in the 1st st, *4 dc, 2 dc*, repeat from * until you reach the 1st stitch marker, (2 dc, ch 1, 2 dc) in the st with the 1st stitch marker, *2 dc, 4 dc* repeat from * until you reach the next stitch marker, (2 dc, ch 1, 2 dc) in the st with stitch marker. Repeat across. Join with invisible join.

Note: *4 dc, 2 dc* means 4 dc sts in the next st and 2 dc sts in the next st.

With round 2 the neckline stretches. You’re gonna adjust the neckline at the end of the pattern.

Round 3 – 8: ch 2, fpdc in the 1st st and in each st across, (2 dc, ch 1, 2 dc) in ch 1 sp, *fpdc in the next st and across, (2 dc, ch 1, 2 dc) in the ch 1 sp* repeat across. Join with invisible join. 

Separating body and sleeves

Round 9: ch 2, fpdc in the 1st st and across until you reach the ch 1 sp. Yo, insert the hook in the ch 1 sp and in the ch 1 sp on another side, yo and pull through both ch 1 sps, yo and pull through the 1st loop, you and pull through 2 loops, yo and pull through 2 loops on the hook (you just made a dc). Now continue working fpdcs across until you reach the next ch 1 sp and repeat the join there. Then fpdc across and join with invisible join. 

Body

Round 10 – 30: ch 2, fpdc in the 1st st and across. Invisible sl st to join. 

Tip: If you want the sweater to be longer, continue working rounds and then go on to the waist.

Waist

Round 31: ch 2, fpdc2tog in next 2 sts and across. Invisible sl st to join. 

Round 32 – 37): ch 2, fpdc in the 1st st and across. Invisible sl st to join. 

Round 38: ch 1 (counts as a stitch), sl st in the 2nd st from the hook and across. Sl st in the ch 1 to join. 

Keep the sl sts loose to maintain the width of the waist. You can also go a hook size up to achieve that.

Finish off. 

Sleeves 

Right side facing attach the yarn in the 1st unworked stitch on the armpit. 

Round 1: ch 2, fpdc in the same st, fpdc across. 

Invisible join: with this join you will make 103rd fpdc. 

1. Yo, insert hook in the st where you just made the last fpdc, insert hook in the very 1st st where you made the 1st fpdc, yo and pull through both sts, yo and pull through (you just made a sl st). 

2. Now you just need to finish the last fpdc: yo and pull through 2 loops, yo and pull through 2 loops. 

3. Now you need to join the upper part of the round with invisible join: pull the loop on the hook a little longer, remove the loop from the hook, insert the hook in the 2nd st from the back, take the loop through that st. Now continue onto round 2.

Round 2 – 36: ch 2, fpdc in the 1st st and across. Invisible sl st to join. 

Tip: If you want the sleeves to be longer continue working rounds and then go on to round 37.

Round 37: ch 2, fpdc3tog in next 3 sts and across. Fpdc in the last st. Invisible sl st to join. 

Round 38: ch 2, fpdc in the 1st and across. Invisible sl st to join.

Cuff

Round 39: ch 2 (counts as a stitch), (dc, ch 1, dc) in the 1st and across. Finish with a dc in the loop from invisible join, ch 1, sl st into the 1st st of the round. 

Round 40 – 41: sl st in the ch 1 sp, ch 3 (counts as a dc and ch 1), work dc in ch 1 sp, (dc, ch 1, dc) in each ch 1 sp across. Sl st in the 3rd loop of ch 3 from the beginning of the round. 

Finish off. 

Repeat for the other sleeve. 

Neckline 

In this round, we’ll fine-tune the neckline for a perfect fit. If you find the neckline too wide, simply switch to a smaller hook for this round to achieve the desired snugness. You can also make two rounds of fpdcs, if needed. 

Attach the yarn in the st where you joined the foundation chain. Ch 2, fpdc across. Invisible sl st to join. 

Finish off.

Video tutorials

You’ll find just about every pattern I offer on my YouTube channel. This is because I want to share my love and knowledge for crochet as far and wide as I can!

Need different sizes and more detailed instructions?

Get the full PDF for optimal viewing on any device or print.

Join the Facebook group!

Crocheting is more fun if you do it with friends. Join the Facebook group to post your creations, get support, and more.

0 Comments

Submit a Comment

Your email address will not be published. Required fields are marked *

Unlock Inspiration! ✨

Subscribe for fresh, unique pattern ideas and updates delivered to your inbox. For a limited time, you’ll receive a complimentary PDF pattern.

Success! You're now subscribed to receive emails from us.

Pin It on Pinterest

Share This