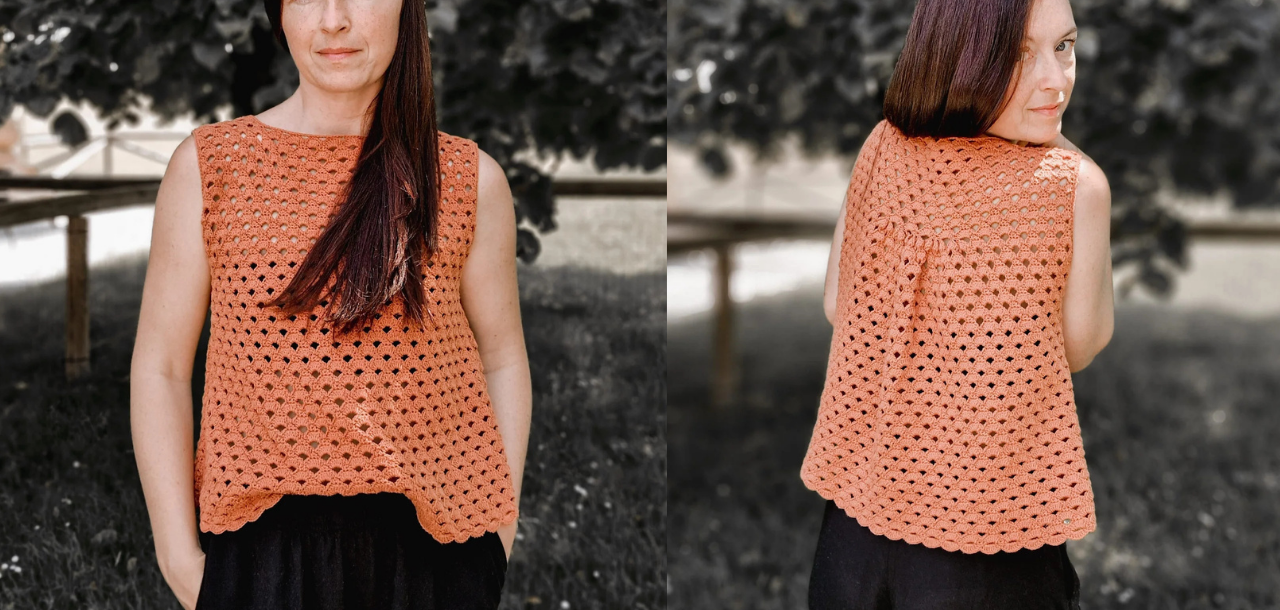
How to Crochet an Arcade Stitch Top

22 Jul 2023 | Patterns | 4 comments

About the author: Karmen Režek

From Ljubljana, Slovenia, I aspire to inspire others with the same joy and fulfillment that crocheting has given me.

Need different sizes and more detailed instructions?

Get the full PDF for optimal viewing on any device or print.

Prefer visual instructions? No problem, watch the YouTube tutorial linked above.

When I first saw crochet arcade stitch, I immediately thought “I HAVE TO learn it!”.

This lovely technique combines geometric, repetitive pattern with lacy structure. Little eyelets are shaped evenly and make the ‘arches’ look sophisticated and bold. It’s a fantastic stitch for those of you, who need a little refreshment, something new and eye-pleasing for your next project.

This stitch requires some skills, but is easy to learn if you know basic crochet techniques. As you can see in the pictures below, it creates a nice even edge and looks great in many colors. 

Project level

Intermediate 

Size

XS/S

Materials

  • YARN: DROPS LOVES YOU 7; yarn group A; 100% cotton; Color 34;
  • 3 mm/D-3
  • Yarn Needle, Scissors, Measuring Tape, Stitch Marker 

Stitch Key (US terminology)

  • ch = chain
  • chs = chains
  • sc = single crochet 
  • hdc = half double crochet 
  • dc = double crochet
  • sk = skip
  • st = stitch
  • sts = stitches
  • slst = slip stitch
  • slsts = slip stitches
  • spc = space
  • spcs = spaces 

Specialty Stitch & Technique Key

Arcade stitch 

Ch 26

Row 1: Place 1 sc in 2nd ch from hook and 1 sc in next ch, [ch 3, sk 3 ch, 1 sc next 3 chs]. Repeat across the row until 5 chs remain. Ch 3, sk 3, 1 sc in next 2 chs. (4 ch 3 spcs, 13 sc)

Row 2: Ch 1, turn. 1 sc first st, [sk 1 sc, 7 dc in ch 3 spc, sk 1 sc, sc next]. Repeat across the row to the end. Your last sc should be in the last st of the row. (4 Dc Fans, 5 sc)

Row 3: Ch 3 (counts as a double crochet and a chain 1 here and throughout), turn. Sk first st and next 2 sts, 1 sc 3 sts [ch 3, sk 5 sts, 1 sc next 3 sts]. Repeat until 3 sts remain. Ch 1, sk 2, dc last. (3 ch 3 spcs, 12 sc, 2 dc, 2 ch 1 spcs)

Row 4: Ch 2 (doesn’t count as a stitch here or throughout), turn. 4 dc in first ch 1 spc. Sk 1 sc, sc next [sk 1 sc, 7 dc in ch 3 spc, sk 1 sc, sc next] Repeat across until ch 1 spc remains. Place 4 dc in ch 1 spc. (3 Dc Fans, 2 Dc Half Fans, 4 sc) 

Row 5: Ch 1, turn. Place 1 sc 2 sts. [Ch 3, sk 5 sts, 1 sc 3 sts]. Repeat across the row until 7 sts remain. Ch 3, sk 5, 1 sc last 2 sts. (4 ch 3 spcs, 13 sc)

Repeat rows 2 through 5.

Notes

  • The top is made of two panels (front and back).
  • Crochet from bottom to top. 
  • When you do the decrease on the back panel for row 51, there are 2 sets of 2 sc (not 3 scs). On row 52, when working over these 2 sets, one sk 1 will not happen.
  • If working with different colors, work the back panel first and then work the front panel, matching the rows.
  • I recommend you watch my YouTube tutorial, if there are any uncertainties. 

Instructions

Front panel

Ch 128 

Row 1 (working in back bumps of the chain) Place 1 sc in 2nd ch from hook and 1 sc in next ch, *ch 3, sk 3 ch, 1 sc next 3 chs*. Repeat across the row until 5 chs remain. Ch 3, sk 3, 1 sc in next 2 chs. 

Row 2: Ch 1, turn. 1 sc first st, *sk 1 sc, 7 dc in ch 3 spc, sk 1 sc, sc next*. Repeat across the row to the end. Your last sc should be in the last st of the row. 

Row 3: Ch 3 (counts as a double crochet and a chain 1 here and throughout), turn. Sk next 3 sts, 1 sc 3 sts *ch 3, sk 5 sts, 1 sc next 3 sts*. Repeat until 3 sts remain. Ch 1, sk 2, dc last. 

Row 4: Ch 2 (doesn’t count as a stitch here or), turn. 4 dc in first ch 1 spc. Sk 1 sc, sc next *sk 1 sc, 7 dc in ch 3 spc, sk 1 sc, sc next*. Repeat across until ch 1 spc remains. Place 4 dc in ch 1 spc. 

Row 5: Ch 1, turn. Place 1 sc 2 sts. *Ch 3, sk 5 sts, 1 sc 3 sts*. Repeat across the row until 7 sts remain. Ch 3, sk 5, 1 sc last 2 sts. 

Row 6: Repeat row 2

Row 7: Repeat row 3

Row 8: Repeat row 4

Row 9: Repeat row 5

Row 10: Repeat row 2

1st decrease 

Row 11: No ch 1, just turn, 1 sl st in next 3 sts. No ch 1, 1 sc in next  3 sts, *ch 3, sk 5, 1 sc in next 3 sts*. Repeat across the row until you have 3 sts left. 

Row 12: No ch 1, just turn, sl st in 1st st, *sc, sk 1, 7 dc in spc, sk 1*. Repeat across until you have 6 sts left, sc. 

Row 13: Repeat row 3

Row 14: Repeat row 4

Row 15: Repeat row 5

Row 16: Repeat row 2

Row 17: Repeat row 3

Row 18: Repeat row 4

Row 19: Repeat row 5

Row 20: Repeat row 2

2nd decrease 

Row 21: No ch 1, just turn, 1 sl st in next 3 sts. No ch 1, 1 sc in next  3 sts, *ch 3, sk 5, 1 sc in next 3 sts*. Repeat across the row until you have 3 sts left. 

Row 22: No ch 1, just turn, sl st in 1st st, *sc, sk 1, 7 dc in spc, sk 1*. Repeat across until you have 6 sts left, sc. 

Row 23: Repeat row 3

Row 24: Repeat row 4

Row 25: Repeat row 5

Row 26: Repeat row 2

Row 27: Repeat row 3

Row 28: Repeat row 4

Row 29: Repeat row 5

Row 30: Repeat row 2

3rd decrease 

Row 31: No ch 1, just turn, 1 sl st in next 3 sts. No ch 1, 1 sc in next  3 sts, *ch 3, sk 5, 1 sc in next 3 sts*. Repeat across the row until you have 3 sts left. 

Row 32: No ch 1, just turn, sl st in 1st st, *sc, sk 1, 7 dc in spc, sk 1*. Repeat across until you have 6 sts left, sc. 

Row 33: Repeat row 3

Row 34: Repeat row 4

Row 35: Repeat row 5

Row 36: Repeat row 2

Row 37: Repeat row 3

Row 38: Repeat row 4

Row 39: Repeat row 5

Row 40: Repeat row 2

4th decrease 

Row 41: No ch 1, just turn, 1 sl st in next 3 sts. No ch 1, 1 sc in next  3 sts, *ch 3, sk 5, 1 sc in next 3 sts*. Repeat across the row until you have 3 sts left. 

Row 42: No ch 1, just turn, sl st in 1st st, *sc, sk 1, 7 dc in spc, sk 1*. Repeat across until you have 6 sts left, sc. 

Row 43: Repeat row 3

Row 44: Repeat row 4

Row 45: Repeat row 5

Row 46: Repeat row 2

Row 47: Repeat row 3

Row 48: Repeat row 4

Row 49: Repeat row 5

Row 50: Repeat row 2

5th decrease 

Row 51: No ch 1, just turn, 1 sl st in next 3 sts. No ch 1, 1 sc in next  3 sts, *ch 3, sk 5, 1 sc in next 3 sts*. Repeat across the row until you have 3 sts left. 

Row 52: No ch 1, just turn, sl st in 1st st, *sc, sk 1, 7 dc in spc, sk 1*. Repeat across until you have 6 sts left, sc. 

Row 53: Repeat row 3

Row 54: Repeat row 4

Row 55: Repeat row 5

Row 56: Repeat row 2

Row 57: Repeat row 3

Row 58: Repeat row 4

Row 59: Repeat row 5

Row 60: Repeat row 2

Row 61: Repeat row 3

Row 62: Repeat row 4

Row 63: Repeat row 5

Row 64: Repeat row 2

Neck hole 

In the 64th row you have 16 arcades. Place stitch markers in the 4th arcade from the left and from right. That’s 5th dc of the 4th arcade from the left side and 5th dc of the 4th arcade from the right side.

We will first crochet the left side. 

Row 65: Ch 3, turn. Sk next 3 sts, 1 sc 3 sts *ch 3, sk 5 sts, 1 sc next 3 sts*. Repeat until you reach the stitch marker and make the last (3rd sc) in the same stitch where the stitch marker is.

Row 66: Ch 1, turn. Sk 1, *sc, sk 1, 7 dc in ch 3 spc, sk 1*. Repeat across until ch 1 spc remains. Place 4 dc in ch 1 spc. 

Row 67: Ch 1, turn. Sc in next 2 sts, *ch 3, sk 5, sc in next 3 sts*. Repeat across until you reach the last arcade.

Row 68: Ch 1, turn. Sk 1, *sc, sk 1, 7 dc in ch 3 spc, sk 1*. Repeat across and make a sc in the last st.

Finish off.

For the right side you will attach the yarn in the stitch where the stitch marker is. 

Row 65: Ch 1, turn. Sk 1, sc in next 2 sts, *ch 3, sk 5, sc in next 3 sts*. Repeat across until you reach the last arcade. Ch 1, dc in the last st. 

Row 66: Ch2, turn. Place 4 dc in ch 1 spc. Sk 1, *sc, sk 1, 7 dc in ch 3 spc, sk 1*. Repeat across until you reach the last arcade. Sc in the last st.

Row 67: No ch 1, sl st in next 3 sts, sc in next 3 sts *ch 3, sk 5, sc in next 3 sts* 2 times. Ch 3, sk 5, sc in the last 2 sts. 

Row 68: Ch 1, turn. Sc in 1st st, *sk 1, 7 dc in spc, sk 1, sc*. 

Finish off. 

Back panel

Ch 152 

Row 1 (working in back bumps of the chain) Place 1 sc in 2nd ch from hook and 1 sc in next ch, *ch 3, sk 3 ch, 1 sc next 3 chs*. Repeat across the row until 5 chs remain. Ch 3, sk 3, 1 sc in next 2 chs. 

Row 2: Ch 1, turn. 1 sc first st, *sk 1 sc, 7 dc in ch 3 spc, sk 1 sc, sc next*. Repeat across the row to the end. Your last sc should be in the last st of the row. 

Row 3: Ch 3, turn. Sk next 3 sts, 1 sc 3 sts *ch 3, sk 5 sts, 1 sc next 3 sts*. Repeat until 3 sts remain. Ch 1, sk 2, dc last. 

Row 4: Ch 2, turn. 4 dc in first ch 1 spc. Sk 1 sc, sc next *sk 1 sc, 7 dc in ch 3 spc, sk 1 sc, sc next*. Repeat across until ch 1 spc remains. Place 4 dc in ch 1 spc. 

Row 5: Ch 1, turn. Place 1 sc 2 sts. *Ch 3, sk 5 sts, 1 sc 3 sts*. Repeat across the row until 7 sts remain. Ch 3, sk 5, 1 sc last 2 sts. 

Repeat rows 2 through 5 until row 50.

Decreasing row

Row 51: Ch 1, turn. Sl st in next 3 sts, 1 sc 3 sts *ch 3, sk 5 sts, 1 sc next 3 sts* 5 times. Ch 3, sk 6, sc, sk 7, sc, ch 3, *sk 7, sc* 3 times. Ch 3, *sk 7, sc* 3 times. Ch 3, *sk 7, sc* 3 times. Ch 3, sk 7, sc, sk 7, sc. Ch 3, Sk 6, *sc in next 3 sts, ch 3, sk 5* 5 times. Sc in next 3 sts.

Row 52: Ch 1, turn. *Sk 1, sc, sk 1, 7 dc in ch 3 spc*. Repeat across. Sk 1, sc. Refer to the notes.  

Row 53: Repeat row 3.

Row 54: Repeat row 4.

Row 55: Repeat row 5.

Row 56: Repeat row 2.

Row 57: Repeat row 3.

Row 58: Repeat row 4.

Row 59: Repeat row 5.

Row 60: Repeat row 2

Row 61: Repeat row 3.

Row 62: Repeat row 4.

Row 63: Repeat row 5.

Row 64: Repeat row 2.

Row 65: Repeat row 3.

Row 66: Repeat row 4.

Row 67: Repeat row 5.

Row 68: Repeat row 2

Finish off. 

Assembling 

Sew the shoulders together: place front and back panel right sides together. Sk 3 sts, attach the yarn through both layers in the 4th st from the right side (front and back panel), ch 1, sl st in next 3 sts. Continue by making 5 sl sts but only in the layer closer to you. Then make 3 sl sts through both layers, 5 sl sts through one layer and 3 sl sts through both layers. Repeat across. Finish off. 

Repeat for the other shoulder.

Side edge of both panels. 

The goal of this step is to strengthen the front panel’s edge and the shoulder area (where you sew together the shoulders). You will do that by working scs, hdcs and dcs across the edge, 2 sts in each arcade row. For more help on how to do the edge watch my YouTube tutorial, the section starts at 52:36 in the video.

With the right side facing you and the front panel, attach the yarn in the edge corner of the front panel. Now you work scs until you get to the peak of every decrease, then work *3 hdcs, 3 dcs, 6 hdcs and 6 scs*. 

Repeat across until you pass the decreasing peaks. 

So after the last peak, continue working scs until the shoulder seam: 

Ch 4 and continue working scs on the back panel. Finish off when you reach the edge corner of the back panel. 

Repeat the process on the other side, but in reverse.

Sewing the sides of the body together 

With a blanket stitch sew the sides, leaving a 21 cm armhole. This top has a larger armhole depth, but you can make it smaller if it suits you better.  Do not cut off yarn. The yarn will be a separate length to do the blanket stitch and for the arm hole. 

Ch 1, sl st flo around the armhole. The sl sts have to be loose. You can also use a larger hook to achieve that. Sl st in the 1st st of the round to join and finish off. 

Neckline 

Attach the yarn in the middle stitch of the 1st arcade in the back of the neckline. Work 1st sc in the same stitch where you attached the yarn and make another sc in the next st, ch 3, sk 5. *sc in next 3 sts, ch 3, sk 5*. Repeat across until you reach the place where the front and back panel are sewed together (orange stitch marker). 

After the last ch 3, make scs between the orange stitch markers. 1st sc goes where the 1st orange stitch marker is. The last sc goes where the 2nd stitch marker is.

*Ch 3, sk 5, sc in next 3 sts* across until you reach the last arcade. Ch 3 and make a sc in the stitch where the stitch marker 

 Sc until you reach the 2nd stitch marker, ch 3, sk 5 and make a sc in the last st (you have 3 scs on the top of the first arcade). Sl st in the 1st stitch of the round to join. 

For the 2nd round: ch 1 and work sl st flo in every st across. Sl st to join and finish off. 

The bottom edge 

Attach the yarn in the middle sc of the first row of the back panel. Ch 1, sc in the same stitch as ch 1, *sk 1, 7 dc in ch 3 spc, sk 1, sc*. Repeat till you reach the point where the two panels are joined. 

When you reach the sides where back and front panel are sewed together, sk 1, 4 scs, sk 1, and than continue with *7 dc in ch 3 spc, sk 1, sc, sk 1*. Repeat across until you reach the seam on the other side. Sk 1, 4 scs, sk 1, and than continue with *7 dc in ch 3 spc, sk 1, sc, sk 1* until you reach the 1st sc of this round. Sl st in 1st st to join and finish off.

Video tutorials

You’ll find just about every pattern I offer on my YouTube channel. This is because I want to share my love and knowledge for crochet as far and wide as I can!

Need different sizes and more detailed instructions?

Get the full PDF for optimal viewing on any device or print.

Join the Facebook group!

Crocheting is more fun if you do it with friends. Join the Facebook group to post your creations, get support, and more.

4 Comments

  1. This pattern worked up easy and quick. I did my test piece in 2 different colors and I love how it turned out. It’s light, loose, and perfect for a summer top. It also was a perfect fit. I am planning on making another one already.

    Reply
  2. I love this pattern. Simple but incredibly effective. I also tested it out and agree it’s really easy and grows quickly, with stunning results. My Mother has stolen the test version and I have a couple more orders for it already from other people.

    Reply
  3. This is such a simple design. I had so much fun testing it. Once you got the hang of the 2 row repeats you are set to go. It works up pretty fast. The result is amazing. I absolutely love my top and will be using it all Summer.

    Reply
  4. This is a beautiful top and I am glad got the opportunity to test it. The pattern flows easily. Thanks Karmen

    Reply
Submit a Comment

Your email address will not be published. Required fields are marked *

Unlock Inspiration! ✨

Subscribe for fresh, unique pattern ideas and updates delivered to your inbox. For a limited time, you’ll receive a complimentary PDF pattern.

Success! You're now subscribed to receive emails from us.

Pin It on Pinterest

Share This