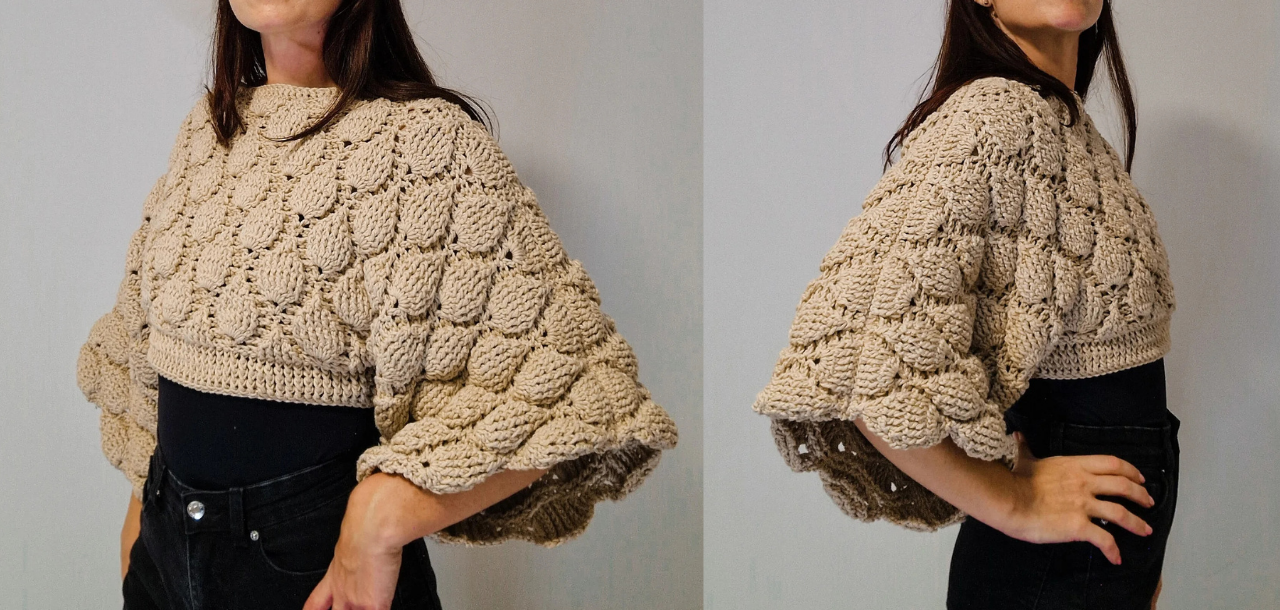
There’s something incredibly comforting about wrapping yourself in a soft, cloudy embrace, especially when it’s a sweater you’ve crafted with your own hands. Today, I’m thrilled to introduce you to the Figs Oversized Crop Sweater.
May Flowers Blog Hop
If you landed here for the May Flowers Blog Hop, welcome!
The Figs Oversized Crop Sweater is featured in the May Flowers Blog Hop. You can grab a copy of the pattern for 50% off in my Ravelry store on May 14th 2024 when you use the code that you’ll find in the main blog post.
The Inspiration Behind the Design
The Figs Oversized Crop Sweater is not just any sweater; it’s an embodiment of style, comfort, and craftsmanship. The sweater boasts a unique 3D pattern in the shape of figs, giving it a distinctive and chic look. Its wide sleeves and cropped design make it a perfect fit for those who love to merge fashion with comfort.
The Sweater’s Anatomy
The sweater’s design is reminiscent of a soft cloud, with its puffy, oversized nature. It’s made of two panels – the front and the back. Crafted from the bottom up, the process involves creating the back and front panels first. Once done, you’ll sew them together at the shoulders and underarms. The finishing touch involves crocheting the waist and adding a round of front post double crochets and slip stitches around the neck hole.
For those who prefer a longer sweater, you can easily adjust the length by adding rows to the front and back panels. This will also result in wider sleeves. Alternatively, you can add rows to the waist. The waist width is also adjustable; simply work more or fewer slip stitches on the underarm seam.
Special offer
Get 20% off on all patterns in my Ravelry and Etsy store in May!
Specialty stitch & technique key
The specialty stitch for this pattern is the Foundation Double Crochet. This technique provides a stretchy base and a neat finish. It combines the foundation chain and the first row of double crochets into one step.
Step-by-Step Guide:
- Start: Chain 2.
- Yarn Over: Wrap the yarn over your hook.
- Insert Hook: Insert your hook into the first chain.
- Draw Up a Loop: Yarn over and pull up a loop. You should have three loops on your hook.
- Create the Base: Yarn over and draw the yarn through the first loop. This creates the base for your next stitch.
- Complete the Double Crochet: Yarn over and pull through two loops. Yarn over again and pull through the remaining two loops.
- Begin the Next Stitch: Yarn over and insert your hook under both loops of the base of the previous stitch.
- Repeat: Continue from step 3 to grow your foundation double crochet row.
Front Post Double Crochet (FPDC)
The Front Post Double Crochet is worked around the post of the stitch from the previous row, giving it a raised texture. It’s perfect for creating ribbing and 3D patterns.
Step-by-Step Guide:
- Yarn Over: Start by wrapping the yarn over your hook.
- Insert Hook: Instead of inserting the hook into the top of the stitch, insert it from front to back around the post of the stitch from the previous row.
- Complete the Stitch: Yarn over and pull up a loop, then yarn over and pull through two loops. Yarn over again and pull through the remaining two loops.
Back Post Double Crochet (BPDC)
The Back Post Double Crochet is the opposite of the FPDC. It pushes the post of the stitch to the back, creating a recessed effect.
Step-by-Step Guide:
- Yarn Over: Wrap the yarn over your hook.
- Insert Hook: Insert your hook from the back to the front around the post of the stitch from the previous row.
- Complete the Stitch: Yarn over and pull up a loop. Yarn over and pull through two loops, then yarn over again and pull through the remaining two loops.
These techniques, when mastered, can elevate the texture and design of your crochet projects. The FPDC and BPDC, in particular, are essential for achieving the 3D effect in the Figs Oversized Crop Sweater. Practice them, and soon they’ll become second nature!
Join Me in Crafting This Beauty
For visual learners or those who prefer a guided walkthrough, I’ve created a comprehensive YouTube tutorial to accompany this pattern. It’s designed to clarify any uncertainties and provide a visual aid to the written instructions.
The Figs Oversized Crop Sweater is available in sizes XS/S, M/L, and XL/2XL. Whether you’re crafting it for yourself or as a gift for someone special, this sweater promises to be a cherished addition to any wardrobe.
Thank you for embarking on this crochet journey with me. I can’t wait to see your creations! Don’t forget to share your progress and finished sweaters with our community. Happy crocheting! 🧶✨
Materials
- YARN: RAINBOW 8/8 Quality, 100% cotton
- XS/S: 950 g / 33 oz, 1425 m / 1560 yds
- M/L 1200 g / 42 oz, 1800 m / 1968 yds
- XL/2XL: 1450 g / 51 oz, 2175 m / 2320 yds
- Hook: 5 mm
- Yarn Needle, Scissors, Measuring Tape, Stitch Markers
Finished sizes
XS/S, M/L, XL/2XL
Panel Width: 103, 110.5, 118 cm
Length: 34, 39, 43.5 cm
Stitch Key (US terminology)
- ch = chain
- st = stitch
- sts = stitches
- sl st = slip stitch
- sl sts = slip stitches
- dc = double crochet
- fpdc = front post double crochet
- fpdc 5 = front post double crochet in next 5 stitches
- bpdc = back post double crochet
- bpdc 2 = back post double crochet in next 2 stitches
- fpdc2tog = front post double crochet two stitches together
- fpdc3tog = front post double crochet three stitches together
- bpdc2tog = back post double crochet two stitches together
Specialty Stitch & Technique Key
FOUNDATION DOUBLE CROCHET
STEP 1: Ch 2
STEP 2: Yarn over and insert your hook into the first chain.
STEP 3: Yarn over and draw up a loop.
STEP 4: Yarn over and draw yarn through the first loop on your hook. This makes a chain stitch.
STEP 5: Yarn over and pull through two loops on your hook.
STEP 6: Yarn over and pull through the last two loops on your hook.
STEP 7: Yarn over and insert your hook under both loops of the base of the previous stitch (the chain you created in Step 4).
STEP 8: Yarn over and pull up a loop.
STEP 9: Yarn over and pull through 1 (like you did in Step 4), yarn over, and pull through 2 twice (as you did in Steps 5 and 6).
Keep repeating steps 7-9 to grow your foundation double crochet row.
Notes
- Ch 2 doesn’t count as a stitch.
- The sweater is made of 2 panels (front and back).
- It’s crocheted from bottom to top.
- First you will make the back and front panel. You will slip stitch the front panel and the back panel together on shoulders and underarms. Crochet the waist and finish with a round of fpdcs and sl sts around the neck hole.
- You can lengthen the sweater by adding rows on the front and back panel (this will also result in wider sleeves), or by adding rows on the waist.
- The waist width can also be adjustable. Work more or less sl sts on the underarm seam for that.
- I recommend you watch my YouTube tutorial if there are any uncertainties.
Instructions
Front and back panel (make 2)
Fdc 137
Row 1: ch 2, turn. Dc in the 1st st, fpdc 5, *bpdc 2, (dc, ch 2, dc), bpdc 2, fpdc 5* repeat from * to the end, finishing with a dc in the last st.
Row 2: ch 2, turn. Dc in the 1st st, bpdc2tog, bpdc, bpdc2tog, *fpdc 2, 7 dc in ch 2 sp, fpdc 2, bpdc2tog, bpdc, bpdc2tog* repeat from * to the end, finishing with a dc in the last st.
Row 3: ch 2, turn. Dc in the 1st st, fpdc3tog, *bpdc 2, fpdc 7, bpdc 2, fpdc3tog* repeat from * to the end, finishing with a dc in the last st.
Row 4: ch 2, turn. Dc in the 1st st, bpdc, *fpdc 2, bpdc 7, fpdc 2, bpdc* repeat from * to the end, finishing with a dc in the last st.
Row 5: ch 2, turn. Dc in the 1st st, (dc, ch 2, dc), *bpdc 2, fpdc2tog, fpdc 3, fpdc2tog, bpdc 2, (dc, ch 2, dc)* repeat from * to the end, finishing with a dc.
Row 6: ch 2, turn. Dc in the 1st st, 7 dc in the ch 2 sp, *fpdc 2, bpdc2tog, bpdc, bpdc2tog, fpdc 2, 7 dc in the ch 2 sp* repeat from * to the end, finishing with a dc in the last st.
Row 7: ch 2, turn. Dc in the 1st st, fpdc 7, *bpdc 2, fpdc3tog, bpdc 2, fpdc 7* repeat from * to the end, finishing with a dc in the last st.
Row 8: ch 2, turn. Dc in the 1st st, bpdc 7, *fpdc 2, bpdc, fpdc 2, bpdc 7* repeat from * to the end, finishing with a dc in the last st.
Row 9: ch 2, turn. Dc in the 1st st, fpdc2tog, fpdc 3, fpdc2tog, *bpdc 2, (dc, ch 2, dc), bpdc 2, fpdc2tog, fpdc 3, fpdc2tog *, repeat from * to the end, finishing with a dc in the last st.
Repeat rows 2 – 9 until row 28. Row 28 will be the repetition of row 4.
Finish off.
Assembling
With a sl st join the shoulders together leaving a 28 cm neck hole (wrong sides facing).
Be careful not to stretch the fabric when determining the width for the neck hole!
Count sts on each panel and mark them with a stitch marker so the stitch count is correct on both sides and both panels.
With a sl st join the underarms together (wrong sides facing).
Be careful not to stretch the fabric when determining the width for the underarm and waist width!
The width for the waist is 40 cm.
Count sts on each panel and mark them with a stitch marker so the stitch count is correct on both sides and both panels.
Waist
Right side facing, attach yarn to the last st with a sl st on either underarm seam, then:
Round 1: ch 2, fpdc in the same st as ch 2 and around. On the other side where the 2nd underarm seam is again work in the last st where you made the last sl st (on both panels). Sl st in the 1st fpdc to join the round.
Round 2 – 4: ch 2, Fpdc around. Sl st in the 1st fpdc to join the round.
Round 5: ch 1 (counts as a stitch), sl st in the 2nd st from the hook and around. Sl st in the ch 1 to join the round.
Finish off.
Neckline
Repeat the instructions for the waist, for round 1 and round 5.
0 Comments